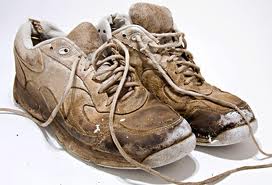
Cleaning Your Sneakers
Getting your sneakers squeaky clean can be a challenge since cleaning your sneakers is not really the top of anyones to do list. However, the state of your footwear says a lot about you so cleaning your sneakers should be an important part of your personal hygiene and appearance routine.
Smellimination
Sometimes you just need to take a break from wearing your cherished pair of sneakers and let air carry the smell out. If odors become extreme, here’s what you can try:
- Remove the insoles of your shoes and shut them in a box containing baking soda. The strength of the odor determines how long the insoles need to be kept in there, but keep in mind that the longer they stay in there, the less odor they will have when you remove them. Set a time period yourself.
- A quick easy trick is to remove insoles and let them dry out between uses, never wear the same shoes two days in a row (a great excuse to go buy some more shoes). Letting them dry out between uses will help with the smell and help extend the life of the shoes.
- There are many shoes sprays you can use as well, or fabric sprays like Lysol fabric mist.
- Another quick tip is to stuff a dryer sheet into your shoes after use.
One product sneakerheads swear by is retaW’s sneaker spray. Made in Japan, the stuff has masculine spicy mint.
Laces
Laces deserve to be as clean as the rest of your sneakers. Clean them well and you may have people complimenting you on your new shoes.

If machine washing (likely the fastest and easiest method), wash them in cold water with like colours, in a pillowcase or a fabric bag meant for delicates so the laces don’t get tangled up in the other clothes or under the washing machine agitator.
If hand washing, fill the sink up with warm water and let the laces soak for 30-45 seconds.
Put a bar of soap to those laces when you remove them from the water and rub it thoroughly over the laces, making sure you cover all the dirtiness. If you lack a soap bar (or if that method doesnt work for getting the stubborn dirt to leave), you can scrub the laces with a small amount of dish soap. After scrubbing the laces, let them soak again in the water for 30-45 seconds. Squeeze the water out of the laces and strategically lay them out on a towel to dry for maximum results.
For really dirty white laces you can soak in a bleach and water solution, but bleach will weaken the fibers and if the laces are so far gone that only bleach will work then maybe new laces are the best option.
If white laces still require more cleaning, you can sprinkle baking soda on them, scrub them thoroughly and let them soak for another 30 seconds before drying.
When it comes to laces, it is best to not wring your laces if they are flat in shape (like laces on Converse most running shoe laces are round in shape). In order to get flat laces free of excess water, pinch the lace with your index finger and thumb and drag down the length of the lace to push the water out of the fabric.
Cleaning the Body of your Sneakers
It is best to clean sneakers as soon as possible after getting them dirty. If you clean them right away, you will often be successful at getting rid of all the dirt using just a cloth and water. For tougher challenges have a couple of different brushes on hand, even a clean toothbrush works.
Start with a clean bowl of water. Apply the solution (either your store bought solution or a mixture of dishsoap and water) onto the bristles of a wet brush. Dip the brush in the water and start scrubbing until the cleaner start to foam up. Wipe it clean. You could use any old towel or T-shirt, but if you use a microfiber towel, you’ll definitely have better results. There are some high-end sneaker cleaners you can use. Jason Markk makes a premium sneakers cleaner.
A quick method to clean shoes soles is to use a Magic eraser. Use a microfiber cloth and water to rinse any film after using the magic eraser. This is a great quick way to do a cleaning of the hard soles of any sneakers.
Be Sure to Brush
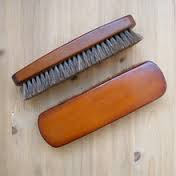
What it really comes down to is the bristle. If you have a shoe with a cotton mesh upper, the mesh is going to pill up when you use a stiffer bristle, so have a couple of different softer and harder brushes on hand.
The brush definitely plays a huge part. It is recommended that you have both standard and hog bristle brushes because sometimes you need that extra stiffness of the bristle to really get in there and clean.
What To Do with Suede
Suede protector is recommended for suede shoes. Before applying suede protector, be sure the shoes are clean and dry. Letting the shoes air dry for at least 24 hours is best. Then you’re good for about eight to ten months, depending on shoe usage. For materials like leather and suede, try a spray from a trusted source, like New Balance. However, all shoes stores will have good leather and suede protectors for shoes.
If your suede shoes get dirty in spite of suede protector, use a soft bristle brush to gently agitate the dirt off the shoe. Be sure the shoe and dirt are completely dry before doing this so you don’t spread the dirt around on the shoe instead of having it fall off.
The Ideal On-the-Go Solution
Always carry wet wipes in your car. Wet wipes are a very quick easy way to touch up stains as they happen. If you drop something on your shoe at lunch, pull out a handy wet wipe and presto, shoe is clean and you don’t have to worry about the stain drying and setting making it harder to remove later.
If you own them, you need to be cleaning your sneakers. They will look better and last longer if taken care of.