...

Kitchen Blender: How to Clean It

How To Clean A Kitchen Blender

A kitchen blender is a useful appliance that can be utilized for making drinks, smoothies, milkshakes, sauces and soups. They are inexpensive, a must-have in any kitchen and easy to clean. Two types of kitchen blenders are the ones with a base and separate carafe, and a hand blender where the blade end is dipped into another container like a tall glass or bowl.

Cleaning a kitchen blender is very easy. Typically, for a blender with a carafe and base, the carafe and base come apart into pieces for easy washing. All of these pieces can go in the dishwasher or be hand washed in warm soapy water. (Watch out for the sharp blades!) If your carafe has a rubber washer in the base, it is best to hand wash it in warm soapy water instead of the dishwasher.kitchen blender how to clean

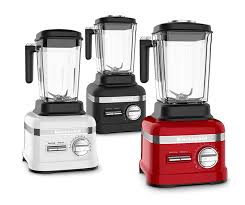
Glass carafe blenders retain a nice look longer because the plastic carafes can get a scratchy and frosty appearance. A glass carafe is dishwasher safe whereas a plastic carafe should probably not go in the dishwasher and instead be hand washed.

The base of the blender and cord can be wiped down with a damp cloth. Do not submerge the electric base of the blender in water.

kitchen blender how to clean it

Hand blenders are typically while plastic or stainless steel. The washing methods are the same for either surface. For hand blenders, do not submerge the whole appliance in water. Only put the blender end with the blades into warm soapy water. Swish the blades end of the blender through the water. This should be sufficient to remove the food bits attached to the blender blades. You may also use a cloth to wipe off any stuck on food. Be careful of the sharp blades. Do not put a hand blender into the dishwasher.

How to Clean a Bamboo Cutting Board

How to Clean a Bamboo Cutting Board

Bamboo is excellent for a cutting board since it is a very sustainable resource. Bamboo grows up to 10cm per day depending on the species during the growing season.

Bamboo is a grass, and grow quickly. A mature bamboo plant takes less than 3-5 years to reach full size. Compare that to an oak tree which matures in about 25 years and can live up to 500 years. This makes bamboo a really fantastic choice for sustainability.

cleaning bamboo cutting board
How to Clean a Bamboo Cutting Board

Classic cutting boards made from maple, walnut, cherry are just not as sustainable as bamboo. Also, bamboo continues to be more and more popular as manufacturing methods have made it easier to make it flat. Additionally, bamboo is very hard more so than most typical wood cutting boards, making them more maintenance free. Since bamboo is so hard, it is also resistant to knife marks etc. This is key as knife scarring on a typical cutting board allows for pockets and grooves for water or moisture to collect and reduces your ability to effectively sanitize the cutting board.

Bamboo resists water better so will not warp or crack as easily as a typical cutting board.

If you wipe immediately after use every time your bamboo cutting board will last for many years. In addition to wiping you can cut a lemon in half and run it across the surface for a natural way to clean and sanitize. Lemons are acidic and will break down organic material to a degree as well as counteract smells.

You can also set up a spray bottle with water and vinegar and use that as a spray cleaner (50% white vinegar and 50% water). The real key is quick clean up after use to prevent cross contamination and make clean up a breeze. I have also seen people use a 3% hydrogen peroxide as a spray cleaner as well. Always dry the board after cleaning, so the wood doesn’t asorb the water. No dishwasher or soaking the board.

If you feel you have to disinfect spraying the hydrogen peroxide onto the board and letting it sit for a few minutes then wiping dry is a good way to go as well. Even using a mild bleach solution (one part bleach nine part water, which is 1:10 solution). This is ¼ cup of bleach and 2 ¼ cups of water in a quart sized spray bottle. Pour the bleach into the bottle first carefully then add the water. Bleach loses its disinfectant power quickly through exposure to light and heat etc. so do not make large batches and replace often.

The key is quick clean up and limit the amount of time moisture is on your board. When possible wipe the board dry. If you have stubborn stains sprinkle, some baking soda on the board and wipe using a cloth and water.

How to Clean Stove Burner Pans

How to Clean Stove Burner Pans

If you have an electric stove with metal catch pans, here are some ideas on how to clean stove burner pans (how to clean stove element pans and how to clean gas stove burner tops as well) Â and make them shine once more.

how to clean stove element pans, how to clean gas stove burner tops
How to Clean Stove Burner Pans

Throwing them in the dishwasher after a spill is likely the easiest way but if you are moving into a rental unit for example, where the cleaning has been poor and you want to get the stove top cleanliness up to a high standard, here are some ways to do so.

Baked on food on a stove top or element pan is one of the most difficult things to clean. Soaking the pans is really your first and easiest choice for how to clean stove burner pans, using hot water and dish soap. Let soak as long as you can then use a scour pad to remove as much  cooked on food as possible.

An essential item to have in your kitchen is a kitchen scraper (hard plastic scraper – See below) that can be used to remove any cooked on food from cookie sheets to pots and pans. You can use the scraper on practically any surface with food gunk stuck on it. It is a good first choice before bringing out the heavy chemicals. Using oven cleaners or strong chemicals like ammonia should be your last resort.

kitchen scrapers
Kitchen Scrapers

Typically, oven cleaners contain lye (sodium hydroxide) which is corrosive and will damage exposed skin so always wear gloves when using these products.

Ammonia can also be used for heavy duty burnt on food removal. However, ammonia is toxic to aquatic animals and it is classified as dangerous for the environment. Always try to use good old fashioned elbow grease and less toxic chemicals first before bringing out the heavy guns.

That being said, sometimes just plain effort is just not enough. If that is the case for your element pans, try this for a speed cleaning tip, but only use one cleaning chemical or the other, NOT both:

  • Put your element pans in a plastic bag and put a little ammonia OR oven cleaner (never use both) in the bag and seat it.
  • Leave overnight.
  • In a well ventilated area and wearing gloves, remove pans from bag and rinse well.
  • Scrub any remaining stuck on food with the kichen scrubber or plastic kitchen scraper.

Learning how to clean stove burner pans can help you keep your kitchen clean. It is easy to do if you just follow the above steps.

How to Clean Fruits and Vegetables

How to Clean Fruits and Vegetables

When thinking about how to clean fruits and vegetables, buying a bottle of cleaner that you see in the produce area of the grocery store may be an option. However, you can easily make your own mixture for a fraction of the cost.

Edible Exteriors

Fruits and vegetables have either edible outsides or not. The benefit of eating the skins of apples, potatoes, zucchini and cucumber, for example, are that you get fiber in your diet. However, the downfall is some fruits and vegetables skins may have been exposed to pesticides. Even if you wash the outside of the fruit or vegetable reallly well, you may not be able to completely get rid of the residual pesiticides. Not good!

This is why it is recommended that you buy organic fruits and vegetables if you plan to eat the skin. It is not as big a deal when you are not eating the outsides like on a banana or an onion.

Instructions

You will need:

cleaning fruits and vegetables
How to clean fruits and vegetables

1 spray bottle (clean and never used with chemicals)

2 cups water

2 tbsp lemon juice

2 tbsp baking soda

Mix the ingredients in the spray bottle. The liquid will appear a bit foamy.

To clean fruits and vegetables, simply spray the liquid on the food. Let sit for 5 minutes. Rinse under cold, running water, using a soft scrub brush on the food if desired. And that’s how to clean fruits and vegetables.

How to Clean a Keurig

How to Clean a Keurig

Learning how to clean a keurig will prolong the life of the brewer and ensure it is operating properly.

How to Clean a Keurig Brewer

how to clean a keurig
How to Clean a Keurig

The external components of a Keurig can be cleaned with a soapy, damp, non-abrasive cloth. Do not immerse the brewer in water or any other liquid. The K-Cup holder, funnel, drip plate and drip tray are all dishwasher safe. The removable water reservoir and lid are NOT dishwasher safe so you should wash them by hand with warm, soapy water and a non-abrasive cloth. In order to ensure you don’t contaminate your water supply, ensure that no cleaning solutions or cleaners are in or near the water reservoir.

Be sure to perform a cleansing brew to ensure that the K-Cup holder is clean and clear of residue after brewing hot cocoa, Cafe Escapes or Perfect Iced Tea K-Cup varieties.

How to Clean a Keurig K-Cup Holder

Remove the K-Cup assembly. The K-Cup holder can be washed in the dishwasher. The funnel is also dishwasher safe. To clean the exit needle of coffee grounds or cocoa mix, insert a paper clip into the tube and move it around to loosen the clog and remove debris.

Descale your Brewer

Every 3-6 months, you should descale your Keurig. Although scale is harmless, it can hinder the operation of the brewer. Please see your Keurig instructions applicable to your particular unit.

Learning how to clean a Keurig brewing systems will allow you years of optimal use.

How to Clean Pampered Chef Stoneware

How to Clean Pampered Chef Stoneware

Learning how to clean pampered chef stoneware properly is important because it keeps your stoneware in the best condition possible, allowing you many years of cooking enjoyment. Pampered Chef Stoneware is a natural clay product. It does not require any special cleaning methods or products. In fact, cleaning Pampered Chef Stoneware is the complete opposite! You only need clean, hot water and a nylon scraper. Do not use dishsoap or put your stoneware in the dishwasher with dishwasher detergent. Soap and detergent will cause the food you cook in the stoneware to taste like soap. Yuck.

how to clean pampered chef stoneware
How to Clean Pampered Chef Stoneware

Here’s How to Clean Pampered Chef Stoneware:

General Cleaning

Hand wash your stoneware.

Be sure stoneware is cool.

Soak stoneware in clean, hot water to loosen any stuck-on food.

Using the nylon scraper that came with your stoneware, scrape off any food.

Rinse and thoroughly dry stoneware before putting it away.

Deep Cleaning

To deep clean your stoneware, make a paste of 1/2 cup baking soda and 3 tbsp of water.

Apply the paste to the areas of the stoneware you want to deep clean. Let sit for 15-20 minutes.

Scrape off paste and rinse really well. Dry stoneware thoroughly before putting it away.


Pampered Chef stoneware comes in many different shapes and sizes. These cleaning tips on how to clean Pampered Chef stoneware are applicable to all stoneware dishes.


How to Clean a Cast Iron Skillet

How to Clean a Cast Iron Skillet

There are do’s and don’ts when it comes to how to clean a cast iron skillet. It is important that you pay attention to these simple instructions so as not to damage your cast iron skillet. If you follow these steps on how to clean a cast iron skillet, you will be able to keep your pan clean, rust-free and well-seasoned.

how to clean a cast iron skillet
How to clean a cast iron skillet

Supplies

– Clean warm water
– Small plastic scraper
– Sponge, stiff brush and plastic scrubbie
– Clean dry cloth or paper towel
– Vegetable oil or shortening
– Kosher salt (optional)

Instructions on how to clean a cast iron skillet:

It is best to clean your cast iron skillet when after use, when it is still a bit warm. Put the skillet in clean, warm water. Use a small plastic scraper, stiff brush or sponge to remove stuck on food. You can also make a paste of salt and water, then scrub the paste on the bottom of the pan to remove stuck on food. If you have stubborn food residue that won’t come off the skillet, try boiling some water in the pan to loosen the food.

Once the skillet is clean, towel dry the inside. You can also put the skillet on a stove burner on low, but do not leave the pan unattended.

After the skillet is dry, pour a small amount of vegetable oil or melted shortening in the skillet and rub it around with a clean paper towel. This is to re-season the pan.

If you have rust in your cast iron skillet, you can use a bit of steel wool, but you will have to re-season the pan afterwards. You can also clean the rust by rubbing the cut side of a potato and a sprinkle of baking soda on the bottom of the skillet. Rinse well with warm water the re-season the pan.

Do’s and Don’ts on how to clean a cast iron skillet:

Do wash your cast iron skillet after use, when it is still warm.

Do store your skillet in a dry place.

Do re-season your cast iron skillet as needed.

Don’t use dishsoap.

Don’t soak your cast iron pan in water. (This may cause the skillet to rust.)

Don’t put your cast iron skillet in the dishwasher.

Don’t use steel wool as this may strip the seasoning from the skillet.

Now that you know how to clean a cast iron skillet, you can treat yours properly to ensure cooking (and eating) enjoyment for many years!

Using Science to clean your Silver….

Using Science to clean your Silver.

How to clean Silver utensils etc. Using a sheet of aluminum foil, hot water, baking soda, table salt and a pan to do this in.

  • Place a sheet of Aluminum foil on the bottom of any baking pan. Put your tarnished silver on the sheet. The silver must be touching the aluminum sheet.
  • Heat some water (in a kettle or souse pot) enough to pour into the pan, covering the silver. Add a small amount of salt.
  • Add a cup or two of fresh baking soda to the hot water (add baking soda before it gets to hot or your solution will bubble over) and salt solution.
  • Once dissolved and quite hot, pour this over the item  making sure contact is maintained between the item and the aluminum foil.
  • Watch the tarnish disappear, this process is sure to impress small children or anyone who did not pass middle school science.
  • Remove when water is cooler and polish dry. It works well and is far less time consuming and expensive than using a silver or metal polish.

Check out the website of scientist B. Shakhashiri for a scientific explanation of the process. Or just go with what works like I do and not worry about the reasons why.  http://scifun.chem.wisc.edu

error

Enjoy this website? Please spread the word :)

Instagram
Follow by Email
RSS