If you do not clean them properly, minor cuts and scrapes can result in a trip to the hospital. It is important to know how to clean a skin wound as soon as possible. This can help prevent infection, lessen any irritation and speed up the recovery process.
Visiting a doctor immediately after becoming wounded is only necessary if the wound is large, deep, has an object in it you cannot remove, or if it is too painful to clean at home. If it does not fall under any of these categories, you can clean a skin wound at home by following these directions:
Pre-Clean
Whenever you can, you should clean your own wound because you are the best judge of your pain threshold. Wash your hands. Put on disposable medical gloves if you have them.
Skin wounds usually stop bleeding on their own, but if bleeding continues past a minute, apply gentle pressure to the wound with a sterile cloth or bandage and elevate it.
Cleaning a Skin Wound
Use a large amount of clean water to rinse off the wound.
Clean around the wound with a cloth wet with water and soap, being careful not to get any soap inside it.
If dirt or debris remains in the wound after washing, use tweezers sterilized with rubbing alcohol to extract those remains. Avoid the use of hydrogen peroxide, iodine or an iodine-containing cleanser, which can be irritating to tissue already injured. As mentioned earlier, see a doctor if there is any debris you cannot remove. Do not poke tweezers deep into a wound (beyond the first layer of skin)!
Post-Clean
Apply a thin layer of an antibiotic cream, such as Polysporin, to a newly clean skin wound to prevent dryness. Although creams and ointments do not make a skin wound heal faster, it reduces the risk of infection.
Cover the skin wound with a bandage, unless the injury is just a minor surface scratch. In that case, it is best to leave it uncovered and let it air out. If you decide to use one, change the bandage at least once a day.
Even after establishing daily cleaning of a skin wound, you should check for signs of infection. These include lack of evident healing, redness, warmth, and swelling. If you clean a skin wound regularly, you should not have to see a doctor about it, but you must remember it is always a possibility when you are injured.
Yes, you really should clean your belly button: the average one contains more than 60 types of bacteria (healthy and harmful alike)! Most people believe they have a clean belly button after the warm water and body soap suds wash over it in the shower, which is the least effective cleaning method because people do not typically dry themselves thoroughly enough. This especially goes for people with innies water can get trapped inside the belly button hole, providing a perfect environment for germs. To get a clean bellybutton, you should have a direct focus on it instead of treating it as an afterthought. Although it is not possible to completely rid it of bad bacteria, you can decrease its population on and around your belly button by following these directions:
Basic Care for a Clean Belly Button
Dip one head of a cotton swab into water or an astringent, like rubbing alcohol or witch hazel. Other solutions you can use include baby oil, hydrogen peroxide, and apple cider vinegar. If your belly button is dry, use Neosporin or Vaseline.
Place it into your belly button and gently work your way around the navel. Do not apply a discomforting amount of pressure.
Repeat the above steps if your belly button is still dirty.
Use a clean swab to remove any excess cleaning solution. Make sure to soak up as much water and/or cleaning solution as possible. You may have to use more than one swab.
After showering, use your index finger and a small section of towel to wipe the belly button and its surrounding skin. Keep an eye on any piercings.
Belly Buttons with Piercings
Soak your belly button with a cotton ball dipped in sea salt water for 5 minutes
Source: https://media.musely.com/u/d2d41432-d99b-4b3d-bd08-ad14234df38d.jpg
to reduce the risk of infection. Table salt will not work as a substitute.
Remove crust buildup by applying a paper towel dipped in the sea salt water and gently wipe it off.
Use a clean towel to completely dry your belly button. It is best to press down lightly to absorb the remaining liquid: any repetitive wiping or scrubbing motions could cause irritation in the pierced area. How often should you clean your belly button? It depends on how fast dirt accumulates inside it. If your belly button is dirt-prone, you should clean it on days you start to notice it. If it always looks clean to the naked eye, you may only need to clean your belly button once every two weeks.
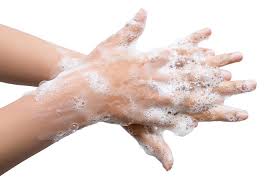
Learning how to wash your hands properly is very important. The number one way to prevent the spread of germs and bacteria is by proper and frequent handwashing. By washing your hands, you can avoid getting a cold, the flu and other diseases.
When to Wash Your Hands
Think of all the things your hands touch during the day. Germs from these surfaces accumulate on your hands and then can spread to your eyes, nose and mouth. While it isn’t possible to keep your hands completely free of germs, you can limit the transfer of germs.
You should always wash your hands before:
preparing food or eating
treating wounds or caring for a sick person
putting in or taking out contact lenses.
You should always wash your hands after:
if they look dirty or feel sticky
using a toilet or changing a diaper
preparing food, particularly raw meat or poultry
touching an animal or its things like toys, leashes, harnesses, clothing
Under clean running water (warm or cold), wet your hands
Turn off the water (think of the environment and save water!)
Apply soap to your hands. Soap can be liquid, bar or powder.
Lather the soap and rub your hands together for more than 20 seconds, being sure to scrub all surfaces including backs of hands, wrists, between fingers and under fingernails
Turn water back on and rinse hands well
Turn water off using the back of your hand or a towel
Dry your hands with an air dryer while rubbing hands together, or use a towel
Does Water Temperature Matter?
In order to kill bacteria, the water temperature has to be really hot, much hotter than our skin can handle. Therefore, water temperature is not really a factor when washing hands. More important is the use of clean water, soap, scrubbing action and drying.
A Tip for Children
When teaching young children how to wash their hands, try suggesting they sing the Happy Birthday song while washing their hands. When the song is over, they are finished washing their hands properly.
Hand Sanitizer
Hand sanitizer is an alcohol-based cleanser that doesn’™t require water to properly clean your hands. When using hand sanitizer, it is important to rub all the surfaces of your hand as you would when washing with soap and water. Hand sanitizers come in a variety of sizes, including travel sizes, so it is easy to take hand sanitizer with you and always be able to clean your hands even if you don’t have access to soap and water.
Washing your hands properly prevents the spread of disease and infection, helping you and the people around you to stay healthy.
Do You Have to Use Harsh Chemicals to Kill Germs and Bacteria?
There is a lot of talk in the media about the spread of germs and flu bugs. The question that naturally arises from this is how to kill germs and if harsh chemicals are necessary.
Universally the number one recommendation that come from every authority figure on the prevention of picking up germs that lead to infection and illness is hand washing.
Are Antibacterial Cleaning Products Necessary?
What kinds of chemicals kill germs, bacteria and viruses? Do you have to use harsh chemicals or antibacterial cleaners?
The discussion of anti-bacterial soaps and cleaning products does present some controversy. Anti-bacterial products kill germs on contact, however, the debate arises in that many people feel that the overuse of these products can create super germs with more and more resistance to antibodies.
Whether this fact is true or not is not 100% clear. However the CDC (Center for Disease Control) performed a study of 224 households using anti-bacterial soaps and found them to not be any healthier than people who don’t use anti-bacterial soap.
Regular soap releases germs from the skin so they can be washed down the sink or wiped up with a towel. Manufacturers would have you believe that anti-bacteria soaps are better than regular soap. However, the study clearly shows that the health levels of the soap and anti-bacterial soap users are the same.
Antibacterial or Not? How Do You Decide?
So if the health effects are the same how do you decide which is the best way to go? If you take the iatrogenic impact of the anti-bacterial soap (the possible creation of resistant super-germs), maybe regular soap is a safer choice.
It is clear that the antibacterial soaps or cleaning chemicals you may use kills the germs on contact. However, if you use a general purpose cleaner alongside proper cleaning techniques, you can remove germs and bacteria just as effectively.
What are Proper Cleaning Techniques?
By proper techniques I mean:
You are using properly laundered cleaning cloths.
You allow the cleaner or soap time to work
You remove the suspended soils using a clean cloth and polish the surface dry.
The problem arises when cleaners are not using properly laundered cleaning materials, are over wetting them or are using unacceptable cleaning methods. In these cases, the soils and germs are not being removed; rather they are just being redistributed as the cleaner cleans.
You could argue that in the presence of unprofessional cleaners that using chemicals, which kill germs on contact, is best. However using poor cleaning techniques will significantly reduce if not eliminate the effects of any chemical used.
I have lost count of the amount of times I have seen otherwise professional looking cleaners using the same cleaning cloth in the washroom and in other areas of an office or home. Â I have also witnessed self-laundering of cleaning cloths. Self-laundering is where the cleaner rinses out the cloths under the tap and rings them out. If your cleaners are not walking out of the building with a bag of cloths to launder be suspicious of their skill set or training, unless the building has a laundry service.
Conclusion
Certainly you need to have an understanding of what chemicals need to be used to be sure you are properly killing germs. However, the techniques being used are far more likely to have a greater effect on the success of any cleaning program than the cleaning products themselves. Don’t underestimate the impact of proper cleaning technique if you are seeking to have a germ free or nearly germ-free environment.
It is important to understand some terminology when it comes to cleaning. Understanding this language will lead you to be able to take a wider approach to maintaining your environment to be germ free and to help stop the spread of germs.
What is cleaning versus sanitizing and disinfecting?
The differences are significant as each level plays a role in the overall cleaning process.
Cleaning
Cleaning is just that, cleaning. It is the act of removing dirt, germs, and residue. It does not necessarily kill germs or bacteria. Cleaning large amounts of soil, dirt, etc. is critical before sanitizing or disinfecting can occur. If sanitizing or disinfecting is the goal, large quantities of dirt or soil will impede the ability of chemicals to do their work effectively.
Sanitizing
Sanitizing is the act of lowering the number of germs on surfaces. Sanitizing reduces the germ count to a level considered safe by public health standards to decrease the risk of spreading infections. (The removal of 99.99% microorganisms).
For a surface to be sanitized it must be cleaned sufficiently, otherwise it is impossible to obtain close contact between the sanitizer and the surface to be sanitized. Also some chemical sanitizers (e.g. chlorine and iodine) react with organic matter and so will be less effective when the surface is not properly cleaned. Sanitizers are designed to clean and sanitize at the same time. However, excessive soil and dirt should always be cleaned and removed first.
Disinfecting
Disinfecting kills germs on surfaces using chemicals. The act of disinfecting does not necessarily clean dirty surfaces or remove germs. The act of disinfecting usually involves a certain amount of dwell time for the chemical solution depending on the manufacturers recommendations. Even disinfecting doesn’t necessarily kill all organisms.
So having an overall cleaning strategy that has an understanding of the true elements of cleaning are important if you are hoping to prevent the spread of germs.
Does Everyday Cleaning Plan Include All Categories of Cleaning?
Does your cleaning plan include all categories of cleaning or are you just cleaning without any awareness of the need to properly sanitize or disinfect? Most professionals will recommend that at the least you should be sanitizing surfaces that are frequently touched in your home or office.
The question becomes, do your people understand what this means? Go into your cleaning closet or janitorial room. Do you see cleaning cloths hanging to dry? If so, you know that your cleaners are very likely just cleaning with a damp cloth. This means they are removing visible soils but not likely taking the next steps in combating the spread of germs by properly sanitizing or disinfecting.
Stop the Spread of Germs
You can help stop the spread of germs by having cleaning supplies on hand for your workstation or keys areas of your home. The quickest and easiest are pre-moistened disinfecting or sanitizing wipes, which you can use to clean the surfaces you touch the most before you start for the day work.
Ensuring a work environment that is clean and sanitary doesn’t have to be difficult. Preventing the spread of germs is really everyone’s responsibility and that starts with good hand hygiene. Be aware of how germs spread and have a good cleaning plan. This helps set the stage for a well-rounded plan to keep germs at bay. Also look for clues (or ask them) to see if your cleaning professional understands the correct techniques to help you stop the spread of germs in your work environment.
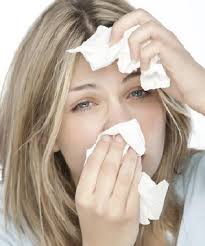
There are some important basic guidelines to follow to ensure you protect yourself during the flu season. Officials at the CDC (Center for Disease Control) are warning about the perils of the flu this year once again.
Already 21 children have died due to flu, which is more than last year at the same time. As the season progresses, more deaths will be attributed to the flu as is normally the case in years past.
Deaths due to the flu for adults are not required to be reported to the CDC, only children. Although it is clearly an indicator of the severity of the outbreak.
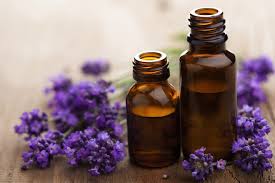
Learning how to get rid of dust mites is important in order to help control allergic reactions in your home.
Dust mites feed on organic materials such as flakes of shed human skin and flourish in the stable environment of dwellings. House dust mites are a common cause of asthma and allergic symptoms worldwide. The mite’s gut contains potent digestive enzymes that persist in their feces and are major inducers of allergic reactions. The mite’s exoskeleton can also contribute to allergic reactions. Here is a natural remedy for the control of dust mites.
How to get rid of dust mites
Researchers at Alexandria University in Egypt found certain essential oils to be effective at killing dust mites, the invisible-unless-under-a-microscope creatures that tend to live in bedding, carpets, furniture and drapes. If you want to keep your allergies at bay, eucalyptus and clove were proven to be the most effective oils for eliminating household dust mites.
Here are three tips on how to get rid of dust mites:
Add around 10 drops of an oil in with your laundry detergent when you wash your sheets in hot water.
Fill a spray bottle with 1 quart of water and 20 drops of an oil to spray on upholstery.
Put baking soda in a sifter and add in 10 drops of an essential oil to shake across carpeting. Then leave the mixture on the floor for 30 minutes and vacuum it up.
How to get rid of dust mites using essential oils
By learning how to get rid of dust mites, you can control and limit their impact in your home.
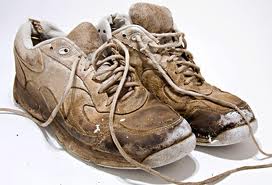
Getting your sneakers squeaky clean can be a challenge since cleaning your sneakers is not really the top of anyones to do list. However, the state of your footwear says a lot about you so cleaning your sneakers should be an important part of your personal hygiene and appearance routine.
Smellimination
Cleaning Your Sneakers
Sometimes you just need to take a break from wearing your cherished pair of sneakers and let air carry the smell out. If odors become extreme, here’s what you can try:
Remove the insoles of your shoes and shut them in a box containing baking soda. The strength of the odor determines how long the insoles need to be kept in there, but keep in mind that the longer they stay in there, the less odor they will have when you remove them. Set a time period yourself.
A quick easy trick is to remove insoles and let them dry out between uses, never wear the same shoes two days in a row (a great excuse to go buy some more shoes). Letting them dry out between uses will help with the smell and help extend the life of the shoes.
There are many shoes sprays you can use as well, or fabric sprays like Lysol fabric mist.
Another quick tip is to stuff a dryer sheet into your shoes after use.
One product sneakerheads swear by is retaW’s sneaker spray. Made in Japan, the stuff has masculine spicy mint.
Laces
Laces deserve to be as clean as the rest of your sneakers. Clean them well and you may have people complimenting you on your new shoes.
Cleaning Your Sneakers and dirty laces
If machine washing (likely the fastest and easiest method), wash them in cold water with like colours, in a pillowcase or a fabric bag meant for delicates so the laces don’t get tangled up in the other clothes or under the washing machine agitator.
If hand washing, fill the sink up with warm water and let the laces soak for 30-45 seconds.
Put a bar of soap to those laces when you remove them from the water and rub it thoroughly over the laces, making sure you cover all the dirtiness. If you lack a soap bar (or if that method doesnt work for getting the stubborn dirt to leave), you can scrub the laces with a small amount of dish soap. After scrubbing the laces, let them soak again in the water for 30-45 seconds. Squeeze the water out of the laces and strategically lay them out on a towel to dry for maximum results.
For really dirty white laces you can soak in a bleach and water solution, but bleach will weaken the fibers and if the laces are so far gone that only bleach will work then maybe new laces are the best option.
If white laces still require more cleaning, you can sprinkle baking soda on them, scrub them thoroughly and let them soak for another 30 seconds before drying.
When it comes to laces, it is best to not wring your laces if they are flat in shape (like laces on Converse most running shoe laces are round in shape). In order to get flat laces free of excess water, pinch the lace with your index finger and thumb and drag down the length of the lace to push the water out of the fabric.
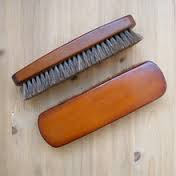
Cleaning the Body of your Sneakers
It is best to clean sneakers as soon as possible after getting them dirty. If you clean them right away, you will often be successful at getting rid of all the dirt using just a cloth and water. For tougher challenges have a couple of different brushes on hand, even a clean toothbrush works.
Start with a clean bowl of water. Apply the solution (either your store bought solution or a mixture of dishsoap and water) onto the bristles of a wet brush. Dip the brush in the water and start scrubbing until the cleaner start to foam up. Wipe it clean. You could use any old towel or T-shirt, but if you use a microfiber towel, you’ll definitely have better results. There are some high-end sneaker cleaners you can use. Jason Markk makes a premium sneakers cleaner.
A quick method to clean shoes soles is to use a Magic eraser. Use a microfiber cloth and water to rinse any film after using the magic eraser. This is a great quick way to do a cleaning of the hard soles of any sneakers.
Be Sure to Brush
Cleaning your sneakers with soft bristle brush
What it really comes down to is the bristle. If you have a shoe with a cotton mesh upper, the mesh is going to pill up when you use a stiffer bristle, so have a couple of different softer and harder brushes on hand.
The brush definitely plays a huge part. It is recommended that you have both standard and hog bristle brushes because sometimes you need that extra stiffness of the bristle to really get in there and clean.
What To Do with Suede
Cleaning Suede Shoes or Sneakers
Suede protector is recommended for suede shoes. Before applying suede protector, be sure the shoes are clean and dry. Letting the shoes air dry for at least 24 hours is best. Then you’re good for about eight to ten months, depending on shoe usage. For materials like leather and suede, try a spray from a trusted source, like New Balance. However, all shoes stores will have good leather and suede protectors for shoes.
If your suede shoes get dirty in spite of suede protector, use a soft bristle brush to gently agitate the dirt off the shoe. Be sure the shoe and dirt are completely dry before doing this so you don’t spread the dirt around on the shoe instead of having it fall off.
The Ideal On-the-Go Solution
Always carry wet wipes in your car. Wet wipes are a very quick easy way to touch up stains as they happen. If you drop something on your shoe at lunch, pull out a handy wet wipe and presto, shoe is clean and you don’t have to worry about the stain drying and setting making it harder to remove later.
If you own them, you need to be cleaning your sneakers. They will look better and last longer if taken care of.
Since a retainer goes in your mouth, it is really important to know how to clean a retainer.
Methods for How to Clean a Retainer
How to Clean a Retainer
The easiest way to for how to clean a retaineris with a toothbrush and toothpaste. A good time to clean your retainer is when you are brushing your teeth since you already have your toothbrush and toothpaste handy. Put a dab of toothpaste on the toothbrush and scrub all over the retainer. Rinse with clean water.
Another method for how to clean a retainer is with organic castille soap. This has been recommended by dentists. Use a squirt or two of organice castille soap in a small dish of water then soak the retainer. The main ingredients in castille soap are olive oil and coconut oil which do a great job of cleaning the retainer without using any chemicals.
Some orthodontists have a very simply recommendation for how to clean a retainer: soak the retainer in water and one denture cleaning tablet. Use two tablets if the retainer has buildup on it. Soak for 15 minutes then rinse.
Words of caution about how to clean a retainer: do not put the retainer in boiling water as this can damage the retainer, do not soak the retainer in mouthwash that has alcohol in it as this can dry out the retainer and cause it to crack. It is not recommended to use baking soda to clean a retainer because baking soda changes the pH of your mouth and a retainer has the potential to absorb and this puts your gums at risk of exposure.
Be sure to also clean your retainer case before putting your clean retainer away. Simply use warm soapy water to scrub all surfaces of the retainer case. Rinse with clean water and dry.
Dentists recommend that you never let your retainer dry out because tartar and biofilm can start bonding to the retainer. Keep your retainer in your mouth or in distilled water in your retainer case.
Knowing how to clean a retainer is an important part of having one.
There are two parts to consider when it comes to how to clean an electric toothbrush: the toothbrush head and the electric handle. Keeping both parts clean is important, particularly after you have had a cold or the flu. Some electric toothbrushes do not have a removable toothbrush head (this is a one piece toothbrush) and some do (this is a two piece toothbrush).
How to clean an electric toothbrush head
After each time you brush your teeth, be sure to rinse the toothbrush head thoroughly, getting rid of excess toothpaste or food bits from your mouth. Once a month or so, soak your toothbrush head in a solution of bleach and water (1 part bleach to 10 parts water) for a hour or so. Rinse thoroughly. Wipe the base of the toothbrush head with a clean white cloth dipped in the bleach solution (do this before soaking the toothbrush head). When the toothbrush bristles start to splay open, it is time for a new toothbrush if you have the one piece electric toothbrush or new toothbrush head if you have the two piece kind.
How to clean an electric toothbrush handle
Because the handle is an electrical appliance, it should not be submerged in liquid. Using a bleach and water mixture, dampen a small area of a clean white cloth. Wipe all over the handle. Dip a cotton swab in the bleach and water mixture and wipe out the area where the toothbrush head attaches to the handle (for a two piece toothbrush).
By using your electric toothbrush properly and taking care of it, including learning how to clean an electric toothbrush, you can be sure to get the longest life out of it.


 with rubbing alcohol to extract those remains. Avoid the use of hydrogen peroxide, iodine or an iodine-containing cleanser, which can be irritating to tissue already injured. As mentioned earlier, see a doctor if there is any debris you cannot remove. Do not poke tweezers deep into a wound (beyond the first layer of skin)!