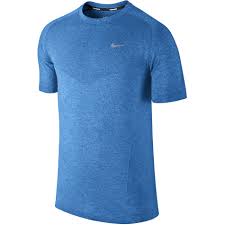
Designed to wick excess moisture away from your body during exercise, Nike Dri-FIT material is unique and very popular. It is made of microfiber and polyester. It is important to clean Nike Dri-FIT items properly to avoid damaging the Dri-FIT features thereby inhibiting the performance of the material.
There are other brands of sports clothing that carry their own line of moisture-wicking material such as Adidas Clima-Lite and Under Armour Tech.
Machine wash item inside out in cold water with like colors.
Use powdered laundry soap instead of liquid laundry soap.
Do not wring out excess water from the item.
Allow the item to hang to dry, or tumble dry in the dryer on low temparature. (Heating the Dri-FIT material in the dryer will reduce the effectiveness of the material and encourage static cling.)
Do not use bleach, dryer sheets or liquid fabric softener. If you accidentally use a dryer sheet with your Dri-FIT item, re-wash it.
Do not dry clean Dri-FIT items.
If you have to iron your Dri-FIT item, use a cool setting to avoid damaging any logos or designs.
Knowing how to clean a Camelbak reservoir is important to prevent them from getting moldy and gross. By cleaning the Camelbak reservoir properly, not only do you avoid drinking gross stuff, you also extend the life of the reservoir, saving you time and money to replace it.
If you use your Camelbak for anything other than water, it is even more important that you clean it properly to avoid mold growth. Thankfully, it is easy to clean your Camelbak reservoir no matter what you put in it.
Instructions for How to Clean a Camelbak Reservoir
It is best if you clean your reservoir after every use by following these instructions as provided by Camelbak:
Hold the reservoir up high while pinching the bite valve so the bleached water can run down through the tube but don’t empty the reservoir.
Let the cleaning solutions sit in the reservoir for approximately 30 minutes.
Empty reservoir.
Wash the reservoir with hot water and dishsoap, being sure to completely rinse away any bleach or cleaning solution (Camelbak has brushes and a cleaning kit to scrub the reservoir and tube: CamelBak Bottle Brush Kit, Blue ). Using a brush can ensure you scrub all areas inside the reservoir and tube.
Prop the reservoir open and air dry completely so there is no moisture left in the reservoir. If there is moisture trapped inside, mold can grow.
By keeping your Camelbak reservoir clean, you will get longer enjoyment out of using it.
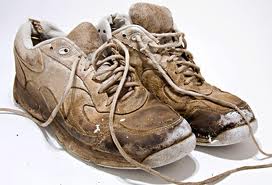
Getting your sneakers squeaky clean can be a challenge since cleaning your sneakers is not really the top of anyones to do list. However, the state of your footwear says a lot about you so cleaning your sneakers should be an important part of your personal hygiene and appearance routine.
Smellimination
Cleaning Your Sneakers
Sometimes you just need to take a break from wearing your cherished pair of sneakers and let air carry the smell out. If odors become extreme, here’s what you can try:
Remove the insoles of your shoes and shut them in a box containing baking soda. The strength of the odor determines how long the insoles need to be kept in there, but keep in mind that the longer they stay in there, the less odor they will have when you remove them. Set a time period yourself.
A quick easy trick is to remove insoles and let them dry out between uses, never wear the same shoes two days in a row (a great excuse to go buy some more shoes). Letting them dry out between uses will help with the smell and help extend the life of the shoes.
There are many shoes sprays you can use as well, or fabric sprays like Lysol fabric mist.
Another quick tip is to stuff a dryer sheet into your shoes after use.
One product sneakerheads swear by is retaW’s sneaker spray. Made in Japan, the stuff has masculine spicy mint.
Laces
Laces deserve to be as clean as the rest of your sneakers. Clean them well and you may have people complimenting you on your new shoes.
Cleaning Your Sneakers and dirty laces
If machine washing (likely the fastest and easiest method), wash them in cold water with like colours, in a pillowcase or a fabric bag meant for delicates so the laces don’t get tangled up in the other clothes or under the washing machine agitator.
If hand washing, fill the sink up with warm water and let the laces soak for 30-45 seconds.
Put a bar of soap to those laces when you remove them from the water and rub it thoroughly over the laces, making sure you cover all the dirtiness. If you lack a soap bar (or if that method doesnt work for getting the stubborn dirt to leave), you can scrub the laces with a small amount of dish soap. After scrubbing the laces, let them soak again in the water for 30-45 seconds. Squeeze the water out of the laces and strategically lay them out on a towel to dry for maximum results.
For really dirty white laces you can soak in a bleach and water solution, but bleach will weaken the fibers and if the laces are so far gone that only bleach will work then maybe new laces are the best option.
If white laces still require more cleaning, you can sprinkle baking soda on them, scrub them thoroughly and let them soak for another 30 seconds before drying.
When it comes to laces, it is best to not wring your laces if they are flat in shape (like laces on Converse most running shoe laces are round in shape). In order to get flat laces free of excess water, pinch the lace with your index finger and thumb and drag down the length of the lace to push the water out of the fabric.
Cleaning the Body of your Sneakers
It is best to clean sneakers as soon as possible after getting them dirty. If you clean them right away, you will often be successful at getting rid of all the dirt using just a cloth and water. For tougher challenges have a couple of different brushes on hand, even a clean toothbrush works.
Start with a clean bowl of water. Apply the solution (either your store bought solution or a mixture of dishsoap and water) onto the bristles of a wet brush. Dip the brush in the water and start scrubbing until the cleaner start to foam up. Wipe it clean. You could use any old towel or T-shirt, but if you use a microfiber towel, you’ll definitely have better results. There are some high-end sneaker cleaners you can use. Jason Markk makes a premium sneakers cleaner.
A quick method to clean shoes soles is to use a Magic eraser. Use a microfiber cloth and water to rinse any film after using the magic eraser. This is a great quick way to do a cleaning of the hard soles of any sneakers.
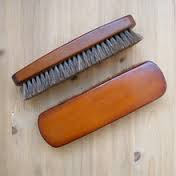
Be Sure to Brush
Cleaning your sneakers with soft bristle brush
What it really comes down to is the bristle. If you have a shoe with a cotton mesh upper, the mesh is going to pill up when you use a stiffer bristle, so have a couple of different softer and harder brushes on hand.
The brush definitely plays a huge part. It is recommended that you have both standard and hog bristle brushes because sometimes you need that extra stiffness of the bristle to really get in there and clean.
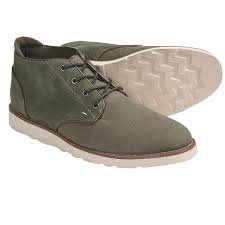
What To Do with Suede
Cleaning Suede Shoes or Sneakers
Suede protector is recommended for suede shoes. Before applying suede protector, be sure the shoes are clean and dry. Letting the shoes air dry for at least 24 hours is best. Then you’re good for about eight to ten months, depending on shoe usage. For materials like leather and suede, try a spray from a trusted source, like New Balance. However, all shoes stores will have good leather and suede protectors for shoes.
If your suede shoes get dirty in spite of suede protector, use a soft bristle brush to gently agitate the dirt off the shoe. Be sure the shoe and dirt are completely dry before doing this so you don’t spread the dirt around on the shoe instead of having it fall off.
The Ideal On-the-Go Solution
Always carry wet wipes in your car. Wet wipes are a very quick easy way to touch up stains as they happen. If you drop something on your shoe at lunch, pull out a handy wet wipe and presto, shoe is clean and you don’t have to worry about the stain drying and setting making it harder to remove later.
If you own them, you need to be cleaning your sneakers. They will look better and last longer if taken care of.
There are three ways on how to clean a yoga mat: by lightly hand washing, submerging it in a tub and hand washing, or washing it in the washing machine.
How to clean a yoga mat
How to clean a yoga mat by handwashing
If your mat is only slightly soiled, spray it with a solution of water and a very small bit of mild dish soap. Use a clean, damp sponge or clean terry cloth rag. Wash the entire mat. Use a clean cloth, only dampened with clean water, to wipe the mat. Dry with a towel, then let air dry.
How to clean a yoga mat by handwashing in bathtub
If you haven’t washed your mat in a long time or it is particularly soiled, you may want to do a more heavy duty cleaning of your yoga mat. Fill your bathtub with warm water and a bit of mild detergent. Submerge the yoga mat and hand wash it using a clean cloth. Rinse with clean water. Towel dry then let air dry.
How to clean a yoga mat by machine washing
Put the yoga mat by itself into the washing machine and using a mild detergent for delicates, run it through the gentle or delicates cycle. Let air dry.
It is important to keep your yoga mat clean, but do not over wash your your yoga mat.
One way to speed up the drying process is to roll up your mat with a towel and squeeze excess water out.
Whatever method you choose to clean a yoga mat, be sure your yoga mat is completely dry before rolling it up. In between classes, it is actually a good idea to hang your mat rather than leave it rolled up.
For the longest time I never bothered to wash my goalie gloves, but over time the smell emanating from my kit became too much. I have seen recommendations to hand wash the gloves carefully with shampoo so be sure the gloves are not damaged. Which works okay I guess if you have the time. You can carefully lather the inside and out with soap and rinse well hanging to dry always.
I however am more lazy than that, I usually just throw them in the wash with similar colors, and haven’t had a problem yet. Always hang to dry, I also don’t wash them often since they likely would fall apart faster. I must say that having started to wash my goalie gloves has extended the life somewhat since for whatever reason in the past I would replace a lot sooner. At the time I thought they were just worn out but maybe it was because they were too funky…
Now that summer is over many of you will be putting away your baseball & softball gloves until “spring training” next spring. Here is some advice on how to keep that glove in top shape and ready for next season Many types of treatments and care have been suggested over the years for baseball and softball gloves. Be sure to find the method that works or you may be looking at the newest selection of batting gloves before next season.
Some of these are safe and some, unfortunately, may damage glove leather. We recommended that one of the best and safest leather cleaners and conditioners is untreated petroleum jelly. Professional glove repairmen and leather specialists agree that this is one of the best applications, both for cleaning and conditioning glove leather.
During the break-in period, treat your new glove with a light application, working it into the leather. This will reduce the stiffness of the new leather and facilitate a faster and more comfortable breaking in procedure. Also, at the end of the season, take a generous amount of petroleum jelly and thoroughly cover the outside and inside of the glove.
Don’t ignore the laces or hard to-get-to areas, both inside and outside the glove. Then take a clean rag and wipe off excess to remove grit and grime. This will also remove and help neutralize much of the salt and acid buildup inside the glove caused by perspiration, a chief problem to the leather lining, usually made of softer leather. We do not recommend neat’s-foot oil, linseed oil or silicon-type spray as these tend to close the pores of the leather, causing it to dry, harden, and become heavy over an extended period of time and through repeated use. Petroleum jelly keeps the pores open and in effect, keeps the leather “alive” while also providing a softening condition.
Basically remember that leather is skin and leather experts tell us not to treat glove leather any differently than you would your own skin. Prolonged harsh temperatures, excessive water soaking (especially use of hot water), abrasives, the salt and acids produced from perspiration and excessive dryness all or individually can be harmful to the glove leather.
Also, continued exposure to sunlight may result in fading of the leather color. Be careful about sealing gloves in plastic bags for over 12 months. We hope this gives all you players a good idea on how to care for your glove until the next time you hear those words so near and dear to our hearts – PLAY BALL!!
(Special acknowledgement to the folks at Nokona for this valuable information)
Gather Cleaning Materials (mild dish detergent, terry towels(2)
To clean your golf grips. You can simply wipe them down with a moist cloth, then dry with a second cloth. You can also spray on a mild liquid cleanser, such as Windex, then wipe off.
The method described here takes a few more minutes than the Windex or water methods, but it works well for getting off the grime that builds up, and for washing away oils from our hands and chemicals from the golf course.
You’ll need a mild dish washing detergent and two cloths, one to use wet and the other to dry with. Fill a Sink with Water and Suds insert a stopper in your kitchen sink. Squirt in detergent as you are filling sink with warm water create lots of suds. Take each of your clubs in turn. Use the wet cloth to grab some suds, then rub the suds into the grip using the towel.
Apply the suds to the grips and work the suds into the grips rinse with warm water and dry with second terry towel. A soft brush is helpful to get the ground in dirt and grease.
Cleaning rags, water, mild detergent, polish or wood oil.
Technique:
Wood bats should be washed with a rag, water and mild soap then dried immediately, especially if the bat is not finished or painted. The key is to be gentle, using a soft cloth to wipe the bat clean. Aluminum bats can be cleaned the same way. For aluminum bats, try using a metal polish for an extra shine, but be sure the bat is dry first. If your wood bat is unfinished a light coat of wood oil will help protect the wood.
For ball scuffs try using a plastic pot scrubber and mild detergent to lightly scrub off the marks. Different brands of bats might be cleaned better with different products so be sure to try out different methods.
Tools & Chemicals:
Laundry pre-treat or laundry soap.
Technique:
Baseball caps are easy just pre-spray the headband with laundry pre treat or use liquid laundry soap and rub it on the head band and throw in the wash with your laundry. The trick is to be sure to take it out right after the rinse.
Reshape the hat and let air dry. Do NOT dry in the dryer this will damage the hat for sure. If you have a hat you are really fond of and want to be even more careful you can buy a product which is designed to go into the dishwasher (it is a rubberized steel rack the shape of a baseball cap) and you can wash the cap in the dishwasher using dishwasher soap on the delicate cycle, again air drying once the rinse is finished.
Tools & Techniques:
To clean golf clubs use a mild detergent and warm water. Wipe the club head with a rag dipped in the soapy water, scrub with a medium bristle brush to remove dirt and grass stains.
The most important thing according to golf pro Ray Pearson is the grooves of the face, “this is what controls the balls flight and spin. What a person can do before cleaning is to use a tee and scrape the dirt out of the grooves”. Dry the entire head and shaft with a clean cotton rag. Never submerge clubs, especially wooden woods as the water can damage the finish and the wood, not to mention they are likely antiques.


 (you can also use