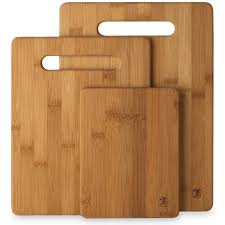
Bamboo is excellent for a cutting board since it is a very sustainable resource. Bamboo grows up to 10cm per day depending on the species during the growing season.
Bamboo is a grass, and grow quickly. A mature bamboo plant takes less than 3-5 years to reach full size. Compare that to an oak tree which matures in about 25 years and can live up to 500 years. This makes bamboo a really fantastic choice for sustainability.
How to Clean a Bamboo Cutting Board
Classic cutting boards made from maple, walnut, cherry are just not as sustainable as bamboo. Also, bamboo continues to be more and more popular as manufacturing methods have made it easier to make it flat. Additionally, bamboo is very hard more so than most typical wood cutting boards, making them more maintenance free. Since bamboo is so hard, it is also resistant to knife marks etc. This is key as knife scarring on a typical cutting board allows for pockets and grooves for water or moisture to collect and reduces your ability to effectively sanitize the cutting board.
Bamboo resists water better so will not warp or crack as easily as a typical cutting board.
If you wipe immediately after use every time your bamboo cutting board will last for many years. In addition to wiping you can cut a lemon in half and run it across the surface for a natural way to clean and sanitize. Lemons are acidic and will break down organic material to a degree as well as counteract smells.
You can also set up a spray bottle with water and vinegar and use that as a spray cleaner (50% white vinegar and 50% water). The real key is quick clean up after use to prevent cross contamination and make clean up a breeze. I have also seen people use a 3% hydrogen peroxide as a spray cleaner as well. Always dry the board after cleaning, so the wood doesn’t asorb the water. No dishwasher or soaking the board.
If you feel you have to disinfect spraying the hydrogen peroxide onto the board and letting it sit for a few minutes then wiping dry is a good way to go as well. Even using a mild bleach solution (one part bleach nine part water, which is 1:10 solution). This is ¼ cup of bleach and 2 ¼ cups of water in a quart sized spray bottle. Pour the bleach into the bottle first carefully then add the water. Bleach loses its disinfectant power quickly through exposure to light and heat etc. so do not make large batches and replace often.
The key is quick clean up and limit the amount of time moisture is on your board. When possible wipe the board dry. If you have stubborn stains sprinkle, some baking soda on the board and wipe using a cloth and water.
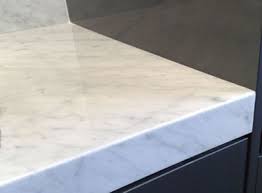
How to Clean Marble Bathrooms, Floors, Tables, Tiles, Countertops and Other Fixtures
You may wonder why there are special techniques used in the care and maintenance of marble. I mean, it’s a rock, right? True, but some stones are softer than others.
Marble is basically limestone that has combined and metamorphosed with other natural elements, making it a relatively soft rock that’s filled with veins of various colors and patterns.
Just like limestone, marble is easily etched, stained, and dulled. It’s more sensitive to certain foods and chemicals, and is not as impervious or as hard and resistant as granite.
Yet marble is very durable, and with proper care, it will last forever.
How to Clean Marble
Below you’ll find tips and information for the following:
Marble Sealers
Marble Maintenance
Proper Cleaning Solutions
How To Do Everyday Cleaning
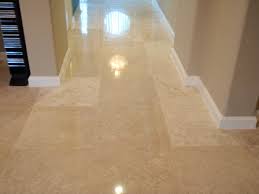
Cleaning Marble Floors
Deeper Cleaning
Disinfecting
How To Clean Up Spills
Polishing
This may seem like a lot, but after you’ve learned a few simple cleaning and maintenance techniques, it becomes almost second nature, just like how you treat wood, cashmere or leather can become routine.
Please allow me to preclude the cleaning tips with a few care tips for new marble, because you should follow them before you clean new marble.
1. Marble Sealers
Immediately after your marble is installed, or after a thorough cleaning and ample drying time for older marble installations, you will sometimes want to apply a sealer to your marble for added protection.
Applying a sealant is pretty easy, and the cost and time involved is minimal when considering how proper marble care helps you avoid damage and expensive marble repair, as well as how it keeps your marble floors and countertops looking gorgeous for years on end.
How a Sealer Works – The sealing products you see used in the stone mason industry are actually impregnators, not sealers. They act more as a repellent. So don’t think a sealer will prevent all stain and damage to your marble. However, an impregnating sealer is often recommended, as it will greatly reduce marble stains from spills that are wiped up immediately.
Sealers Do Not Totally Prevent Scratches or Stains. Sealing does not make the stone stain proof, rather it makes the stone more stain resistant.
Sealing will not prevent scratches or etching (chemical etching often occurs due to acidic substances, such as household cleaners and acidic foods).
Choose the Proper Sealer – Use a high quality sealer made specifically for stone or marble. There are many out there, and it might be hard to know which ones will do the best job at penetrating the stone or which lasts the longest. We personally recommend sealers like SenGuard or Stone Care to help protect your marble.
For kitchen counters, be sure your sealer is non-toxic and safe for use in food preparation areas.
2. Marble Maintenance
Efflorescence – For I newly installed marble, you might see a white powder that appear on the surface. This is normal, and harmless. It’s just mineral salt deposits brought up through the stone as the water in the stone evaporates.
How to Clean Marble Countertops
You can vacuum or dust mop the powder, but don’t use water to remove the powder, as that will the stone longer to dry out and finish evaporating its own moisture.
You may have to do this many times until the stone permanently dries out, but if the efflorescence problem persists for more than two months, contact the installer to determine if there isn’t something else causing the moisture.
Protect Marble From Scratches. No sharp objects. Don’t scoot or set sharp-edged objects directly on marble.
Use coasters, trivets and mats. Use coasters for glasses, trivets or placemats for plates, and mats for appliances on marble countertops. This not only prevents scratches, but prevents damage from heat, or etching caused by spills of acidic drinks such as orange juice or alcohol. To keep it simple, just treat your marble like nice wood, and use coasters.
Use padding. Use padding under table legs and chairs. No heavy objects on thin marble. Don’t stand or sit on your marble countertops or tables. Too much weight can cause a crack on thinner marbles, like that used for countertops.
Use vanity trays. Place toiletries such as hand soaps, toothpaste, lotions, perfumes, etc., on a decorative bathroom vanity tray. This protect from scratches, as well as etching caused by chemicals in hygiene products, and may even prevent stains from those products, as well. Such a bathroom vanity tray will not only protect your marble bathroom sink counter area, but you’ll feel like you’re in a fancy hotel with posh decor.
Use floor mats, area rugs and hallway runners near every entrance, as well as any high traffic area where you have marble tile floors. This helps minimize scratches from dirt, sand and grit. Of course, make sure your rugs are slip-resistant.
3. Proper Cleaning Solutions
Many common household cleaners contain alkalis, acids, and chemicals that can damage or etch your countertop surface, as well as thin and dissolve the sealant, which leaves your marble vulnerable to damage from stains.
Cleaning marble with your typical brand name or generic household cleaners, and even natural cleaners, is the most common cause of marble damage.
Don’t use ammonia, vinegar, orange or lemon for cleaning. Although vinegar is a good cleaning agent and disinfectant for many surfaces, it is acidic, as are the other items mentioned, and they can cause corrosive etching on your marble.
And definitely don’t use the average bathroom, grout cleaner, or tub and tile type cleaners. These often use abrasives that can dull and even scratch the surface of your marble.
Many rust removers that are commercially available, such as toilet bowl cleaners and laundry rust stain removers, contain trace amounts of hydrofluoric acid (HF). The silicates and other minerals in your marble will be attacked by the HF acid and deteriorate them.
So What Do You Use To Clean Marble?
I’ve heard it said that you simply use hot water and a sponge for daily cleaning, and once a week use a stone cleaner. However, that seems to me like it applies just to floors or areas that don’t need to be sterile. Some disinfecting tips are listed below.
Whatever you do, only use cleaning products specifically formulated for cleaning marble and you will save yourself the headache and hassle of costly and time-consuming re-polishing or repairs.
There are many marble cleaning products on the market, but four brands that have proven to be better than most are Marble Life, SCI, Miracle and Stone Tech). They all offer great quality and value.
4. How To Do Everyday Cleaning
Whatever cleaner you use, make sure you use it with a sponge, soft cloth, chamois, or dust mop. Don’t scrub because you will spread bits of dirt and sand around, which could scratch the marble.
How to Clean Marble Floors
Run the damp sponge or cloth gently over the surface while making a circular motion in any spots that might need a extra pressure. Thoroughly rinse the surface after washing, and be sure to change the rinse water frequently when cleaning larger or extra-dirty surfaces.
Don’t leave either pools of water or even a slight layer of moisture to dry on the marble to prevent stains and scum build-up. Use a soft, dry cloth to dry all the marble surfaces after you’ve cleaned them. Then buff it with a second dry cloth for a nice shine. (See below for more polishing tips.)
5. Cleaning Marble Floors
Dust mop floors made with marble tile on a regular basis. Unless you plan to eat off your floor, the only cleaners you need to use to clean your marble regularly are hot water for daily cleaning and a specially formulated stone cleaner once a week.
Use a non-treated, dry, clean, dust-mop. Be extra careful if you use a vacuum cleaner because grit jammed in the wheels or ragged, worn parts can scratch the surface. So be sure the wheels are not rough, and that the plastic or metal attachments or in good shape, preferably with soft bristles that are not worn.
6. Deeper Cleaning
You can get a deeper cleaning with a light, natural soap, or take some gentle dish soap and dilute it yourself, as the suds help remove dirt particles trapped in the marble pores.
Similar to any item cleaned in your home, an excessive concentration of cleaner or soap may leave a film and cause streaks, so use it sparingly and buff it with a soft cloth afterwards for a beautiful shine.
Tip: Minimize soap scum in commonly wet areas, such as the bathroom, by using a squeegee after each use. You can also look for a non-acidic soap scum remover specifically designed for marble.
Of course, we want to disinfect surfaces in the bathroom, kitchen I and other areas, and areas such as hot tubs and pools sometimes attract algae, moss and mold. So go ahead and flush the area with plain water and use a mild bleach solution to thoroughly sterilize an area.
7. Disinfecting
There are commercial cleaners available that are specifically made for marble, that will disinfect and won’t harm your marble. But if you’re in a pinch and need to disinfect something right away, there are common household items you can use.
Hydrogen Peroxide – Mold is common in bathroom tile grout and can be a serious health concern. To get rid of the mold, mix one part 3% hydrogen peroxide with two parts water and spray on the effected areas. Wait an hour before rinsing or showering. It does act like a bleach in that it will lighten darker marbles (and can bleach your clothes, or hair, etc.) so it’s best for lighter color marble surfaces.
Vinegar or Ammonia – Bleach is not the only solution. I know I mentioned how ammonia and vinegar should be avoided because they can hurt your marble. But if you need to disinfect your marble and can’t wait to find a better cleaner, then you can use ammonia OR vinegar on occasion. Just don’t get in the habit of it, as it really will dull and etch your marble. But as long as you use a low concentration, rinse well with plain water, buff it well afterwards, and use a polish, and don’t use it too often, then it shouldn’t harm your marble. DANGER: do not EVER mix bleach with vinegar, or ammonia and bleach, or ammonia and vinegar, etc. Use each one separately. Mixing any of them together causes harmful gases that will damage your lungs and the lungs of those around you.
Bleach – Bleach is toxic and should be a last resort. Also, bleach can lighten darker marbles, but it is an effective disinfectant for lighter marbles if used properly. To kill common bacteria and regular disinfecting of food related surfaces, use unscented, regular 5% to 6% household bleach, as recommended by The Center for Disease Control (CDC, an American government regulatory agency) at a ratio of 1 tsp bleach per gallon of water. For common disinfecting of all other surfaces, use 1 Cup of bleach per 5 gallons of water. And to kill mold and mildew that has already gotten a foothold, use 1 Cup of bleach per one (1) gallon of water.
8. How To Clean Up Spills
Marble can become stained or etched quickly if a liquid or even dry powders sit on it for even a short period of time. Especially clean up wet spills like coffee, any type of black tea, orange juice, and wine immediately after they are spilled.
Dry spills are serious, too. Materials with staining pigments, such as curry, cumin, coffee grounds, and even leafy greens, should be gently vacuumed or swept up right away when they’re spilled on any marble surface.
How to Clean Up a Spill – Blot. Flush. Dab. Repeat. Blot up spills with a paper towel immediately. Don’t rub as you wipe the area, or it it will push the spilled substance into the pores of the marble as well as spread the spill. Flush the area with mild soap or cleaner of your choice, or even just plain water, and rinse several times. Thoroughly dry the area with a soft cloth. Repeat as necessary.
8. Polishing
After each cleaning, after you’ve dried the marble, give it a quick buff with a soft cloth. This helps remove cleaning solution residues and gives your marble a shiny glow. There are also commercial marble polishes available. Just make sure it’s intended specifically for marble. Not all stone is the same, so it’s best to avoid cleaners made for granite or even for cleaning ”stone” in general.
Stone PLUS Cleaner has received rave reviews for its effectiveness on marble.
A spray surface dressing, such as Dazzle Topical Polish Shine Enhancer, will improve the shine and give your marble a little more protection.
Polishing a marble floor can make a very slippery surface when wet, so take precaution when other people may walk on those floors shortly after you’ve polished them.
Marble is so gorgeous, with luxurious beauty, that it is well worth the time it takes to learn and apply these few marble care tips.
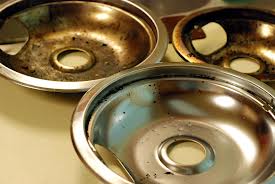
If you have an electric stove with metal catch pans, here are some ideas on how to clean stove burnerpans (how to clean stove element pans and how to clean gas stove burner tops as well) Â and make them shine once more.
How to Clean Stove Burner Pans
Throwing them in the dishwasher after a spill is likely the easiest way but if you are moving into a rental unit for example, where the cleaning has been poor and you want to get the stove top cleanliness up to a high standard, here are some ways to do so.
Baked on food on a stove top or element pan is one of the most difficult things to clean. Soaking the pans is really your first and easiest choice for how to clean stove burner pans, using hot water and dish soap. Let soak as long as you can then use a scour pad to remove as much cooked on food as possible.
An essential item to have in your kitchen is a kitchen scraper (hard plastic scraper – See below) that can be used to remove any cooked on food from cookie sheets to pots and pans. You can use the scraper on practically any surface with food gunk stuck on it. It is a good first choice before bringing out the heavy chemicals. Using oven cleaners or strong chemicals like ammonia should be your last resort.
Kitchen Scrapers
Typically, oven cleaners contain lye (sodium hydroxide) which is corrosive and will damage exposed skin so always wear gloves when using these products.
Ammonia can also be used for heavy duty burnt on food removal. However, ammonia is toxic to aquatic animals and it is classified as dangerous for the environment. Always try to use good old fashioned elbow grease and less toxic chemicals first before bringing out the heavy guns.
That being said, sometimes just plain effort is just not enough. If that is the case for your element pans, try this for a speed cleaning tip, but only use one cleaning chemical or the other, NOT both:
Put your element pans in a plastic bag and put a little ammonia OR oven cleaner (never use both) in the bag and seat it.
Leave overnight.
In a well ventilated area and wearing gloves, remove pans from bag and rinse well.
Scrub any remaining stuck on food with the kichen scrubber or plastic kitchen scraper.
Learning how to clean stove burner pans can help you keep your kitchen clean. It is easy to do if you just follow the above steps.
When trying to keep your home neat and tidy, cleaning up the clutter is the first thing to do. Better yet, don’t let clutter accumulate in the first place! The best way to reduce or avoid clutter altogether is to handle each thing only once. Instead of dropping dirty clothes on the floor only to have to pick it up later and put it in the laundry hamper, put them directly into the laundry basket. Put things away the first time. It takes you less time to do it right the first time than having to come back and put clutter away later.
If you find putting stuff away in the first place is too tough for you, you may want to have a designated clutter area – perhaps a bin in a closet or a specific place on the kitchen counter. Be sure to periodically put away the things at your clutter spot. Once you are in the habit of putting your clutter in your designated place, you may find it easier to gradually start putting things away instead of in the clutter spot.
In many cases, once you start eliminating clutter, you will find it easier to keep your house clean, as a sense of pride in a clean home can be encouraging for everyone in the home.
Your hardwood floor is installed. There is no flooring that looks as comfortable or luxurious as a beautiful hardwood floor. How do you care for and clean Hardwood flooring? It is an investment you certainly want to protect. Most major stores will have hardwood floor basics for equipment and supplies for cleaning hardwood floors. You may find some specialty pieces of equipment at flooring stores.
Floor mats are essential when it comes to cleaning hardwood floors. Tiny particles, like dirt, can act like sandpaper and scratch your wood. A floor mat at each entryway and having family members and guests to wipe their feet, the majority of dirt and grime will remain on the mat. Having a good mat before and after you go in your home goes a long way to trap the dirt before you enter the house. Try and use over sized mats where you can and regularly sweep or vacuum them as well. Also put a floor mat or rug in any area where water could be splashed like near the kitchen sink. This will hinder any possible water damage.
Note that rubber-backed or non-ventilated floor mats or rugs can damage your floor. Instead use floor mats or rugs made especially for hardwood floors or use hardwood floor pads under the mat. It is pretty important to keep under the mats clean as well a build up of dirt and the movement of the mat will cause damage to the floors.
Cleaning Hardwood Floors
The more frequently you clean the easier it is to keep your hardwood floors clean, and the better care you take, the longer your floor will maintain its original beauty. Step one is to purchase a high quality broom so that you can sweep your floor regularly of dirt, dust and other particles.
Second step is a vacuum cleaner without a beater bar, to get in between the boards and other hard to reach areas. Be sure your vacuum tool is always in good repair and the brushes are good, once they wear you don’t want the actual tool to start scratching the hardwood floors.
Deeper cleaning techniques vary depending on the installation and finish of your hardwood floor. For Finish in Place hardwood floors, using an 8x14 terrycloth mop with a rotating head that makes cleaning corners, under cabinets and along base boards as simple. In any case always use very little water this is why standard mops not recommended to clean hardwood floors. A flat hardwood floor mop leaves little space for water and is always best.
Professional cleaning products recommended by your flooring retailer can be used to remove tough stains and spills without dulling the finish of your wood floor. Makers of Pre-finished floors recommend their own specific products for routine maintenance. Check with your retailer for details.
Do and Don’ts
Don’t wax a wood floor with a urethane finish
Do use cleaners that won’t leave a film or residue
Don’t use ammonia cleaners or oil soaps on a wood floor they’ll dull the finish and affect your ability to recoat later.
Do use a professional hardwood floor cleaner to remove occasional scuffs and heel marks (just spray some cleaner on a cloth and rub the stained area lightly)
Don’t wet mop or use excessive water to clean your floor (wood naturally expands when it’s wet and can cause your floor to crack or splinter).
Do clean sticky spots with a damp towel or sponge
Do minimize water exposure and clean spills immediately
If and when your hardwood floor begins to look like it belongs beneath the feet of gold miners in an old western saloon, it’s time to consider screening and re-coating.
Screening is the process used to abrade or grind down your floors polyurethane finish. Next, fresh coats of urethane are applied. The result is a rejuvenated floor that looks as good as the day it was installed!
If the damage to your hardwood floor is severe, then you may require sanding and refinishing. This process involves sanding your floor down to the bare wood and refinishing it. Only go to this effort if screening and re-coating doesn’t solve your problem. Replacement boards may be available so you don’t have to refinish the entire area. Be sure to go pro whenever you have work done on your hardwood floors!
Final Thoughts
All hardwood floors fade or change shades over time. Like our own skin, woods exposure to sunlight may greatly increase this process and cause permanent damage.
Window treatments are recommended to shade your floors from the suns harsh rays. We also recommend rotating area rugs and furniture regularly, allowing wood floors to age evenly from UV exposure.
To avoid permanent marks and scratches, it’s a good idea to cover furniture and table legs with flannel protectors. Be careful when moving heavy objects across your floor to avoid scuffing.
Ladies your stiletto heels may be fashionable, but what’s not in fashion (or covered by your warranty) are the dents and scratches they cause to wood floors. I had a friend who held a big dinner party after installing new hardwood floors only to wake up to hundreds of little dents in his brand new (and now not so perfect) hardwood floors. So have a dinner party but keep it casual, nothing fancy. Likewise, trim your pets nails regularly and keep any and all other sharp objects don’t walk with scissors is a good rule always) away from your floors.
Follow these basic tips for clean hardwood floors that stand the test of time for years to come.
Domestic cleaning is a part of all of our lives. However, the time may come when you have a large house or a busy schedule and you cannot handle all of the cleaning yourself and would like to hire a domestic cleaning company. Before you do so, be sure you know what to expect from a housekeeper.
A housekeeper is responsible for the removal of litter, dirt and stains. A housekeeper does not generally pick up toys, clothes, or other clutter, though. Talk with the house cleaning company to determine what is considered clutter and what isn’t. For example, some charge extra for cleaning dishes, but not for putting dishes in a dishwasher. Dusting, sweeping, vacuuming and mopping are standard responsibilities for a housekeeper. Cleaning tubs, showers, bathroom counters and mirrors are also usually included in the cost.
For an additional charge, you can add on just about anything you want to: washing windows, TV screens, cleaning blinds, dusting baseboards, watering plants, folding laundry and changing sheets. Prices vary depending on the types of services done, the size of your house and how often you have a housekeeper come out. Most domestic cleaning companies require payment at the time of services in the form of cash or check.
You can have a housekeeper come while you are home or while you are away. Homeowners often leave a key with a housekeeper or under the mat, when hiring a company, since the housekeeper may change from week to week. Housekeepers should bring their own supplies and you have the option of choosing eco-friendly products or more mainstream products.
Domestic cleaning service is a great idea for families that are busy and have the extra income to pay for it.
In order to remove house mold there are several different strategies that you could take. Mold inside your home can be a serious problem for you. It can cause health concerns for the inhabitants as well as decimate the value of the property if it spreads throughout. Taking care of mold when you first notice it is very important. Here are a few easy ways to remove house mold.
Using chlorine bleach is one way to help remove mold. However, it will not work in all situations and in all surfaces. You should only use chlorine bleach if the mold is growing on a non-porous surface. For example, if you have the mold in your bathroom on a hard surface such as a bathtub or countertop. If you have mold on wood, chlorine bleach will not work because properties in the bleach prevent it from going deep down into the wood and killing the roots of the mold. You can use bleach to disinfect the area after you remove the mold, but on porous surfaces, you should stay away from chlorine bleach.
One thing that will work on porous surfaces is detergent. One common ingredient in many laundry detergents is borax. Borax is great for penetrating deep into porous surfaces and eliminating mold and other materials. Therefore, if you have mold on wood or another porous surface, this would be a great product to use. You can mix it with water and form a nice compound for removing mold quickly and efficiently. Scrub the area with this mixture and a scrubbing brush to remove the mold. Then you can disinfect it with chlorine bleach after.
Another common household item that can be used to remove mold is hydrogen peroxide. Mix 1 cup of warm water with 1/2 cup of hydrogen peroxide. Then scrub the surface of the mold with this mixture to remove it.
Make your next broom your last… Some ideas to make your brooms last longer and do a better job.
1. Always use a holder to keep the broom stored off the floor or store with the broom side up. (Resting on the floor the fibers will flatten and reduce the effectiveness of the broom).
2. Comb out the fibers regularly to remove debris.
3. Brooms and dustpan can be cleaned with mild detergent and water; this is a good job for your spouse if they forget your birthday.
4. Always sweep gently in order to let the bristles do the work.
5. Push broom blocks have two handle holes (one on each side). Change the sides often so that fibers wear evenly.
6. The correct length for a broom handle is from the floor to the bridge of your nose. Remember to sweep in an upright position to prevent back fatigue.
Brick is a very porous material. Many paints and coatings “soak in” to brick or concrete, and this can make them difficult to remove. If the paint is primarily on the surface, a good scrubbing with a mildly acidic cleaner works best. But if the paint has penetrated, you will have to do a heavy etching with muriatic acid to remove it. Working with Muriatic acid can be dangerous so make sure you read all the instructions so you don’t hurt yourself or the bricks. There are some specialized coating removers that come in a paste form that work well for this type of application, but they are not widely available at this point in time. The Hydrostrip line from ICI or a product called Masonry Strip available from Napier Environmental Technologies are the products to look for. They are also sold under the Biowash.com brand name found in paint stores like Sherwin Williams, Cloverdale Paint, and major home centers like Home Depot etc. check www.Biowash.com for a 1-800 to locate the product near you.
If the paint has dried you have a challenge.
Try these techniques :
For an old stain try using a paint remover (from a hardware store). Test a small area first. This is a fairly harsh chemical designed to turn paint to mush so it can be removed from furniture for refinishing etc.
Scrape and remove (using a spoon) as much of the paint as possible.
If the paint remover is working apply more as needed. Be careful not scrub, this will force the paint deep into fibers, and can also damage the fibres leaving a hole or much lighter appearance.
If the stain is still there, cover with glycerin and let sit for several hours in an attempt to loosen the stain.
Then treat as a fresh stain and start by sponging out as much of the stain as possible before applying a laundry pre-treat – launder in warm water. Do not put in the dryer. Inspect the stain to see if you have to try again to remove it. The heat from the dryer will set the stain!
If you are fond of these pants try going to a professional cleaner. Point out the stain and ask if they think they can remove it; they likely can with better results than trying at home.
If the paint is oil based the pre-treatment should be a solvent designed for oil based paint (paint thinner).