...

How to Clean House Gutters

How to Clean House Gutters Quickly and Easily

Cleaning the gutters and downspouts of your house just comes with the territory of owning a home, but it doesn’t have to be a big chore. Although it’s not the most fun task, it isn’t that difficult, doesn’t take that long, and will help prevent damage to your roof and the eaves themselves. Plus, it helps make your house look nicer.

Why You Should Clean Your Gutters

If you don’t clean your gutters, major damage will eventually plague your house when rainwater cannot go down a blocked drain. That blocked water builds up and gets under your shingles or rooftop material, and

How to Clean House Gutters

rots the wood of your roof, trim and siding, and water can even get into your house, which we all know is not good.

Downspouts that are clogged in fall and not cleaned before the snow falls can become a problem. During warm winter days or the spring when the snow melts, if the melt water cannot go down the drain, tis can cause a big ice lip to build up at the edge or your roof that not only prevents snow from sliding off your roof, but it also puts a massive amount of weight on your roof. This can lead to a damaged roof or even a collapsed roof.

Even if the roof eaves of your house don’t get clogged or overflow each season, it’s just not a good idea to leave decaying debris in your gutters, as it’s an invitation to mosquitoes and carpenter ants.

So no matter how busy or lazy you feel, the little effort it takes to clean your gutters can save you lots of headache and damage costs. It’s definitely worth the effort, and not worth the consequences if you don’t do it. So let’s get to it.

Get the Right Tools

  • Ladder
  • Gloves
  • Trowel or Hand Scoop
  • Trash bag or Bucket
  • Rope (if you do this alone)
  • Garden Hose

Be Safe

If your home is more than one story, you may need an extension ladder. But even if your house is only one story, you could get seriously hurt if you fall. So no matter how many stories you have, make sure your ladder is stable. Either use a stabilizer, or make sure you’re on level ground, or both.

Figure out how you’re going to get your trash bag or bucket down before you start. It will be heavy and awkward, but if you can hand it to someone, or lower it with a rope if you’re doing this job solo, you’ll want to have this planned out before you start. Don’t wait until you’re umpteen feet above the ground, on the roof, balancing a heavy bag, wondering what to do with it.

Gloves don’t just help keep your hands and nails clean, but they can protect your hand from sharp objects. Leather ones will protect your hands better than cloth, as well as keep them cleaner. Make sure they’re the right size so you can do this job safely and properly.

Where to Start

After you have all your tools in place, it’s best to start where the downspouts are, which is typically at the corners, but not always.

Start at the downspouts so you can avoid pushing debris down the downspout and further clogging it, by simply pushing debris away from the drain hole as you clean the gutters.

Do it Right

  1. Simply scoop the debris into your bag or bucket. Use your trowel for the big stuff, and you may need to use your hands for the small stuff and gunk stuck to the bottom. If the debris is wet, I recommend a
    How To Clean House Gutters Quickly and Easily
    How To Clean House Gutters Quickly and Easily

    bucket rather than a bag, unless you use an extra sturdy bag. Wet stuff is heavier than dry stuff, so you may not want to fill the bag all the way up.

  2. After all the larger debris is removed, rinse the gutter with your garden hose, spraying toward the direction of the nearest downspout.
  3. You will need to clear any downspouts that may be clogged. If you start by spraying water down the spout from the top, you may just compact the clog so it gets lodged in tighter and becomes harder to budge. The best way is to start at the bottom of the drain spout and shoot some water up so it hits the bottom of the clog by using the spray nozzle of your hose at the highest pressure setting. Then get on the roof and shoot water down the pipe from the top. If it’s a loose clog, this should clear it up. If this still doesn’t clear it up, you can use a plumber’s snake, or if the clog is near the top, any type of long pole, like the end of a rake, will do. Collect the clog at the bottom of the spout after it comes out and put it in your debris receptacle.

Follow all the above procedures for all your gutters and downspouts of your home, garage, or any outbuildings you have that have gutters.

And finally, dispose of all the debris you’ve collected by putting it in the trash, or more preferably, a compost pile. You may already have your own compost pile, or can start one, or often your local city offices can tell you where a free community compost trash receiving site is located.

And that’s How to Clean House Gutters Quickly and Easily!

And now you can sit back and relax as you pat yourself on the back for taking care of business and keeping your property well taken care of. It’s okay to admire your own work, because not only do you now have clean gutters, but also peace of mind.

Prevent Future Problems

Use a stand-off or stabilizer, which not only keeps your ladder stable, but it also keeps your ladder from resting on, and thus possibly damaging or denting your gutters.

Inspect the gutters and downspouts now for any signs of damage. Look for holes, dents, or cracks. If you discover any signs of damage, repair them as soon as possible.

It’s best to clean the eaves and gutter spouts of in late spring or after nearby trees have finished shedding their leaves in the fall. If there copious amounts of trees or rain in your area, you should probably check your gutters more often.

Other Tips

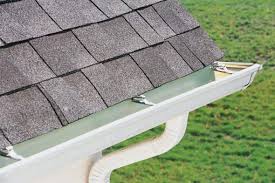
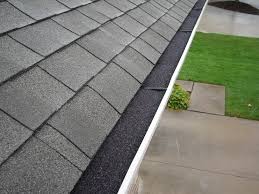
Install leaf strainers inside the eave near the drain hole to prevent leaves from going down, and possibly clogging, your downspout.

You may want to consider installing guards that prevent the debris from sliding off your roof into your gutter in the first place. They won’t stop all falling leaves and branches from landing in your gutter, but can make your biannual gutter cleaning much more easy in the future.

Your local city yard refuse disposal site is also a great place to get free compost for your garden in the spring.

Cleaning algae from your roof

If you have black, unsightly stains on your asphlat roof, the most likely cuase is algae feeding on the limestone within your asphalt shingles.  While there several ways to prevent further growth, and many companies that provide roof cleaning, it is a project you can do yourself, of course taking all the precautionary measures required when working at heights, on potentially slippery surfaces.  In order to remove or limit future algae growth you will need to remove the existing algae stains.  There are a number of commercial cleaners available, but oxygen bleach is just as effective, and not as hard on your lawn, shrubs and the environment in general.

Watch the weather closely and try to wait for a dry, overcast day.   This cleaning solution works best out of direct sun, but you also need a dry spell so the cleaning solution isn’t just washed away!

Using a pump type sprayer (a backpack style unit is ideal as it will free you both your hands for other things, like holding onto the ladder, keeping your balance on the roof, etc).  Mix up the oxygen bleach in the reservoir of the pump sprayer.  Check the manufacturer’s instructions for the correct dilution rates as each product may recommend slightly different proportions.  Wear your safety goggles and gloves when you are mixing the solution.

Spray down the roof with the oxygen bleach solution.  It is best to spray the entire roof so that you do not have lighter coloured patches where the bleach was sprayed and darker areas where it was not.  Allow this treatment sit for 20 minutes to half an hour, but if the day is warm or windy enough that the solution may dry, then you will need to re-apply the solution.

Agitate the roof gently with the stiff broom using caution not to scrub so hard as to remove granules from the shingles themselves. The bleach will kill the algae and lighten the stains and using the broom, you will be able to scrape existing algae off and remove the stains as well.  Work in a systematic manner from the peak down to the gutter.  Use caution for the last section you are cleaning as you will need to stand on the area you have just scrubbed and it may be slippery!  Use a safety harness over the peak and secured properly.

Rinse off the roof thoroughly using the garden hose using a gentle sprinkle of water starting at the peak and working toward the gutter.  Never use a pressure washer, or even a focused stream of water from a pressure type nozzle.  This will either dislodge excessive granules from the shingles or force its way under the shingles!  If it doesn’t actually cause your roof to leak it will reduce the lifespan of regular asphalt shingles each time it is done!  Also use caution to not apply such significant amounts of water that it races over the gutter and into your yard.  This just adds another step to the clean up process.  The rinse will dilute the bleach and remove the algae so that you can determine if you need to repeat the treatment or just let the roof dry.

Use caution and remember that if you don’™t feel up to performing this job yourself there are many contractors that professionally do this kind of work.  Get references and ask to see before and after pictures it CAN make a huge difference in the appearance of your home!

Cleaning Algae from your fish tank

With a little work and a few simple cleaning supplies you can remove the unsightly algae from your fish tank.  Here are some of the supplies you will need:

Algae scraper/pad, Razor blade, Regular Household Bleach, Filter media, Water siphon, Lime remover or aquarium glass cleaner, Clean rags or towel, Paper towels

Start by cleaning the inside glass, then decorations, gravel, the exterior of the glass and cover and finally the filter.

Begin by giving the glass a thorough cleaning on the inside with an algae pad. There are a wide variety of algae scrapers on the market, from long handled scrubbers to magnetic scrubbers. Although they appear the same, houseware cleaning pads can have soap and chemical residue imbedded in the fibers. This reside can be lethal to your fish, so only use pads specifically intended for aquariums.

For stubborn residue on the glass, use a razor blade held at a very narrow angle to scrape it off. If your aquarium is acrylic, use a plastic razor blade, as steel razors will scratch acrylic even if you are very careful.

Once the inside glass is cleaned, remove rocks, artificial plants, or decorations that have significant algae growth, or are noticeably dirty. Do not clean them with soap or detergents as it is impossible to completely remove soap residue, and as mentioned even a trace can be lethal to fish. Typically a good scrub with an algae scraper will remove the algae and dirt from rocks and plants. For particularly stubborn cleaning problems, mix a 10% bleach solution and soak the items for 15 to 20 minutes. Scrub any remaining residue off, rinse thoroughly in running water, and allow to air dry, in the sun if possible.

Live plants can bleached, however stem plants are not tolerant of bleaching. To bleach live plants prepare a 5% bleach solution, soak the plants for two minutes, then rinse well. Leave the rocks, decorations and plants out of the tank while you vacuum the gravel. This way none of the debris stirred up from the gravel will settle back on the cleaned items.

Clean the gravel next, by using a water siphon to vacuum away the debris. There are several types of siphons available, all of which work essentially the same. Be sure to vacuum the entire surface of the gravel thoroughly so that all debris is removed.

Once the inside of the aquarium is cleaned, clean the hood, light, tank top, and outside glass. Regular glass cleaners contain ammonia, which is toxic to fish. Standard lime cleaners are even more toxic. I strongly urge using vinegar or cleaners designated as aquarium safe, and rinse rinse rinse!

After the outside is clean, the rocks, plants, and other decorations may be returned to the tank. Now wait a couple of weeks before cleaning the filter. Why wait? The major cleaning you just performed disturbed the beneficial bacterial colonies on the plants, rocks, and gravel. Fortunately many beneficial bacteria reside within the filter media, so you haven’t completely upset the Eco-system. However if you changed the filter at the same time, you might trigger a dangerous ammonia spike because there aren’t enough beneficial bacteria left to eliminate the toxins.

When you are ready to clean the filter, should you clean or simply replace the filter media entirely? Some experts caution that replacing the filter media removes too many of the beneficial bacteria, and triggers a new tank break-in cycle.  Some experts argue that sufficient bacteria reside on the rocks, plants, and in the gravel to prevent the tank from cycling when the filter is replaced.  What you should do depends on the type of filter media you use.

If you have filter media containing carbon, ammonia absorbers, or ion-exchange resins, it should be replaced if it’s more than three weeks old. After a couple of weeks the absorbing qualities of the media have been exhausted, and it no longer serves its purpose. Media that acts as a mechanical filter instead of absorbing toxins (i.e.: ceramic rings, filter fiber, or sponges) should be gently rinsed to remove debris and returned to the filter instead of replaced. If care is taken to use water that is the same temperature as the aquarium water, and the media is quickly returned to the filter, the bacterial colonies growing on them will not be lost entirely.

Don’t forget to clean the filter tubing and other parts of the filter assembly. A filter brush will help clear out the sludge that invariably builds up in all the small crevices.

Regular maintenance is the key to avoiding or significantly increasing the time between these major cleaning procedures.  Scrape the glass weekly, vacuum the gravel every time you perform a water change, and clean any rocks or plants as soon as you see debris or algae on them. Clean the filter monthly, either by replacing the media, or rinsing it. With regular care, your aquarium will look beautiful all the time.

For fish tank cleaning visit All Pond Solutions

Mattresses, Box Springs, and Futons

Would you crawl into bed with a bunch of bugs? No? Well you do. Every single night. They are called dust mites, and they are everywhere. They thrive on dead skin, your dead skin. Yum. Yum. If you aren’t completely disgusted by now, check out our article on Dust Mites, to find out why they contribute to allergy problems.
In addition to these dust mites, their feces, and all that dead skin they are waiting to munch on, your bed also collects dust, lint, hairs, and other assorted debris that is floating around our homes.

Regular cleaning of your mattress, and the bed linen keeps these potential allergens in check. It also will increase the life span of your sleeping habitat.
The mattress should be flipped over a couple times per year. It is a great idea to co-ordinate it with changing your clocks to and from day light savings time, or on Independence Day and New Years Eve, if you don’t have much of a life outside your home.

The first time flip it over side for side, and the next time flip it over end for end (A note left between the mattress can remind you which way it is suppose to be flipped). This equalizes the wear of the mattress, and minimizes peaks and valleys. It is also a good plan on “flipping day” to vacuum the entire mattress and box spring. If you use a plastic mattress cover, wipe it down after vacuuming with a disinfectant.
Plastic covers are a must for young children who might have a periodic bed wetting accident. If you don’t have a cover when one of these accidents happens, check out the tip in our data base on cleaning urine from a mattress.
Futons
Although thought to be owned only by starving college students, there are those of us who have grown to love our futons. Like mattresses there are dozens of different firmness levels, and methods of construction depending on the manufacturer.
Typically there is a foam core, wrapped with cotton, in a heavy cotton fabric envelope. When cleaning, you should avoid getting a futon too wet, as it takes forever, or possibly longer, to dry completely. A moist futon is a bad thing, as warm, moist, dark areas tend to grown things (like fungus and mildew) that we don’t normally want to sleep with. Stains should be removed with as little water as possible, and usually blotting with a damp rag will remove most surface stains.
Futons should be rolled up every couple of months, and allowed to stay rolled up tight for an entire day, if possible. Turning them frequently will also lengthen their useful life significantly.
Sweet dreams

Skylights

The snow piles up on them, trees dump sap and leaves on them, mildew can grow on them, and we won’t even discuss what birds do to them.  Okay, we will…did you hear about the rich pigeon?  He just made a deposit on a BMW. Same thing for skylights, except that if you have to look up at “the deposit” during breakfast every morning, it isn’t all that funny.

You should clean your skylights once or twice a year to keep the grime from building up, and permanently damaging the surface, especially on Plexiglas skylights. The grime and dirt can cause minute scratches to Plexiglas skylights, which will leave them with a clouded appearance.  This can be expected for older skylights, as Plexiglas degrades over time, or even for new skylights in areas that have acidic rainfall.  One great, albeit unusual tip, for Plexiglas and regular glass, is to wax the skylight with an automotive paste wax after it has been cleaned thoroughly.  A couple coats of wax, will protect against environmental damage, and will make rainfall bead off…..so you can see those horrible grey clouds.

Try to clean the inside and exterior on the same day.  Start on the inside by moving any furniture from beneath the skylight opening and lay a plastic cloth on the ground to catch any spills. Skylights are rarely placed for cleaning convenience, so determine the safest way to access the opening. Is it over a tub? Above a staircase? On a vaulted ceiling?  The inside doesn’t get very dirty, unless the skylight is in a kitchen, above a shower or tub, or near a fireplace. Usually the worst problem is spider webs, followed by grease build-up, and plain old dust.

If the skylight is flat glass, use a squeegee on the end of a broom stick or extension pole.  See the Window section for specific instructions.  For ‘bubble’ style lights, use a regular glass cleaner. If the skylight can not be reached by hand, try spraying some window cleaner on a clean rag draped over a broom. Replace that rag with a fresh, dry rag, to wipe off any residue and prevent streaks.

KEEP THE PLASTIC DROP SHEET IN PLACE WHILE CLEANING THE EXTERIOR!

  • Bring up a bucket with dish soap and a sponge to the roof.  Don’t fill it with water until you are on the roof.
  • Take up your garden hose, and hose down the skylight.
  • Fill your bucket with water, and wash the skylight with the sponge.
  • Rinse thoroughly. If there is sap, bird, or bug excrement, use a citrus based cleaner. Be certain to test any chemical on a corner of the skylight to be certain it does not damage Plexiglas skylight lenses.

Safety:  It is advisable to have someone spot you when climbing the ladder. Always use caution on a wet roof or ladder. Never take undue risks, if in doubt, call a professional!

Central Air Conditioning

Exterior Evaporator Unit

Turn off the electrical power to the outside condenser/compressor unit.

Cut weeds, grass and bushes within 24 inches of your condenser unit.  Vacuum the fins on the exterior of the condenser unit with a soft brush. Vacuum around the entire unit to remove any leaves and other debris that has built up in or around the fins.  Using a dinner knife or a specialized fin comb to gently apply pressure to damaged or bent fins and straighten them out. Don’t insert the knife more than a half inch into the fins or you risk damaging the coils inside.  Remove the fan from the top of your condenser/compressor unit by unscrewing the top grille. Lift the fan out and manually remove any leaves or debris that have collected inside the unit.  A vacuum might be the easiest option, but use extreme caution to NOT damage any of the components with the steel vacuum wand.  Wipe down the inside of the unit with a damp cloth. Use a garden hose to spray the fins from the inside out, using a fair amount of water pressure. Place the fan back in the unit and fasten the screws to secure the top.  Turn the power back on and set your indoor thermostat to “Cool” to allow the compressor unit to cycle on.

Interior Evaporator Unit

Turn off the power to your furnace before you start cleaning the indoor evaporator unit.

Open the main blower compartment of your furnace and remove the filter. If it’s disposable, replace it with a new one. If it’s reusable, place it in a tub and cover it with water and add a little laundry detergent to create some suds and let it soak for about 15 minutes. Rinse with a shower head from both sides and allow to air dry before re-installing the filter back in the furnace unit.  Use a vacuum with a soft brush attachment to suck up any dust in the blower compartment. If the motor has lubrication ports, add a few drops of electric motor oil into each port to keep them running smoothly.  Locate the plastic condensation drain tube and pull it off the drain port. If there is algae growth inside, mix one part bleach and 16 parts water into a solution and pour it into the tube. If flushing doesn’t remove the dirt, replace the tube.  Clean grime and dirt out of the drain port with a pipe cleaner. Put the drain tube back onto the port and turn your main power switch back on.  Give yourself about a half day to clean your air conditioning unit if you’re doing it for the first time.  Try to clean your air conditioning unit when the temperature is about 60 degrees Fahrenheit so you can be certain it will cycle on once the cleaning is complete.  Consult your owner’s manual for any special cleaning instructions that apply to your unit.

error

Enjoy this website? Please spread the word :)

Instagram
Follow by Email
RSS