Top 5 Carpet Stain Removal Mistakes

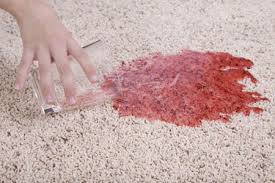
Carpet stain removal can be a challenge. To get the best results, avoid these top 5 carpet stain removal mistakes:

  1. Start spraying chemicals – Please DON’T do this! It is unnecessary if you act quickly in removing the stain.  Using a dry towel, tamp down and absorb as much of the stain first, or scoop or scrape up as much as you can.  Over loading stain with chemicals is a sure way to set stains and make them harder to remove. Only after you have done this should you introduce chemicals. Use measured amounts, being sure to rinse the chemicals out so if the stain persists, you are not mixing chemicals by trying different products together. Leaving chemical or soap residue will only attract dirt faster once the area is dry.
  2. Use heat on stain – The default should ALWAYS be to USE COOL WATER.
    carpet stain removal
    Carpet Stain Removal Mistakes

    Using heat on some stains, like dairy products, will set them. Certain stains will respond to warm or hot water but if you do not know what the stain is use cool water always.

  3. Scrubbing scrubbing scrubbing – BE GENTLE. When cleaning, we often scrub the back and forth action which works well when you are cleaning pots and pans, but it just doesn’t work for carpets. Most carpets have an underlay. The scrubbing and pushing action just pushes the stain deeper into the carpet and underlay.  You have to be thinking about how to lift the stain from the carpet. Vigorous scrubbing only makes it harder to remove.
  4. Leave stain 100% of the time, LEAVING THE STAIN UNTIL LATER WILL MAKE IT HARDER TO REMOVE. In the worst-case scenario, if you have to leave a spill on carpet, place a dry towel on top of a spill so some of it can soak into the towel. And only use a white or light colored towel to avoid any possible color transfer from the towel to the carpet. Leaving stain to dry will set the stain most of the time.
  5. Not pre-testing – When using any new cleaning chemicals, ALWAYS PRE-TEST in a small, inconspicuous area of carpet. You always want to be sure the cleaning chemicals won’t react with carpet and cause damage to the surface you are cleaning.

Check out this tip on how to clean urine from carpets.

Clean Birkenstocks: How to Care for Them

How to Clean Birkenstocks

With the right amount of dedication, you can wear in your Birkenstock sandalsclean birkenstocks without wearing them out.  Maintaining clean Birkenstocks is challenging because a shoe of its kind is made of lesser used natural materials, such as recycled cork and untreated leather. There is a straightforward way to clean Birkenstocks without damaging them: the company produces their own cleaning solutions.  Shield the cork footbed from the elements and prevent dried-out edges from manifesting by using Birkenstock Cork Sealer, eliminate odours and dirt with the Cleaner & Refresher, and protect leather straps with a coat of Water & Stain Repellent.

Alternatively, universal shoe-cleaning products suffice if you already have them on hand.  The more often you clean Birkenstock sandals, the more life you will get out of them.  Here are the cleaning procedures you should follow, according to Birkenstock:

Cleaning Birkenstock Footbeds

  1. If the cork looks like it’s drying out, apply a thin coat of sealant to the affected edges.
  2. Let sealant set completely before the shoes are worn.
  3. Spray the entire footbed with your cork-safe surface cleaner and wipe it down with a cloth to catch excess dirt.
  4. If your shoes have suede or nubuck footbeds, brush them to extract the dirt. Avoid using liquid to clean them.

Cleaning Upper Straps

  1. Apply repellent regularly to protect upper Leather, Suede and Nubuck from clean birkenstocks
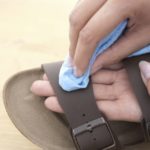
water and dirt. Birkenstock defines regularly as being on each day that you wear your sandals.
  2. Parts of the straps with suede or nubuck surfaces should be brushed to pull up dirt and dust.
  3. If your Birkenstocks have non-leather straps, wipe them clean with a cloth damp with water and a small amount of soap to treat stains.

Additional Care Tips

  • Anything you use to clean Birkenstocks can change the look and finish of the materials, so be careful to test cleaning products not endorsed by the company on a small section of the shoe that is not visible when worn.
  • Keep your sandals out of extreme heat, as prolonged heat exposure leads to irreversible damage. When you are at the beach removing your Birkenstocks to cushion your feet on sand of equal comfort, it is best to pack them away in your bag. Birkenstock even recommends not leaving their shoes in parked cars on hot days!  If they become wet, you must wait patiently for them to air dry.
  • Birkenstock emphasizes the need for a frequent cleaning schedule, but if you want or only have the time to get by on the bare minimum, you should clean Birkenstock sandals at least once a season.

How to Clean Converse Sneakers

How to Clean Converse

Well-loved and clean Converse sneakers: these concepts go together like two left shoes.  Clean Converse sneakers, if used often, are naturally not kept as such by their wearers. Canvas is fabric, therefore, it is a dirt magnet.  Some agree that their Chucks look best when worn in rather than brand new, but if you consider yourself to be on the other side of the age-old debate, this article is for you.  Many Converse owners who prefer them clean make the mistake of only cleaning their collection when it gets too dirty to ignore. This makes cleaning them harder. Although they can (or should) never be thrown in the wash, having clean Converse is easy if you have the right materials.

Pre-Cleaning Your Converse

After they have been exposed to dirt, clean Converse sneakers as soon as possible.  Select a mild soap (one with a lower alkaline content, with a pH less than 8) to clean it.  In this case, dish soap diluted with water is a common cleaning solution.  You should dab your soap of choice on an area of the clean conversesneaker that is normally hidden when you are wearing it, such as the area underneath its laces or the outer edges of its tongue.  This is to test whether the soap alters the colour of your sneakers: if it does not at first, it is a good sign, but it is important to give it an hour or so before you start a complete clean, just in case a colour change does not immediately appear.  For extra unclean Converse, maximize the effectiveness of your cleaning by removing the laces from both shoes. Follow these instructions to clean Converse of canvas, leather, and suede varieties, drawn from the Converse company website:

Canvas

  1. Remove excess dirt to clean the outsole (the part of the shoe that steps on the ground).clean converse
  2. Mix lukewarm water and a small amount of mild soap, as defined in the previous paragraph.
  3. Dampen a cloth with the soapy mixture and gently scrub affected areas. (You can use a microfiber cloth to maximize cleaning efficiency.)

Leather and Synthetic

  1. Remove excess dirt to clean the outsole.
  2. Mix lukewarm water and mild soap.
  3. Dampen a cloth with the soapy mixture and gently scrub affected areas.

Suede

  1. Brush dirt off with a suede brush.
  2. Do not use soap or water.

Drying your Converse

  1. Dry at room temperature.
  2. If the Converse are deflated from wetness, stuff them with paper to maintain their shape and prevent wrinkles.
  3. For prolonged sneaker life, avoid using direct heat such as the blast from a hair dryer to accelerate the drying process.

One final consideration: as Converse pleads with you four times in their cleaning guide: never, ever machine wash or dry your Converse.

How to Clean Leaf Stains off Driveway

how to clean leaf stains off driveway
How to clean leaf stains off driveway

The changing colors of fall leaves are truly beautiful but the bright reds, oranges and yellows can stain your driveway so you might want to know how to clean leaf stains off driveway. On a gorgeous, clear fall day, bundle yourself (and your kids) up warmly and head outside to get to work.

How to Clean Leaf Stains off Driveway

Cleaning the leaf stains off your driveway is a great job that kids can do. Rake or sweep any leaves and debris off the area you are planning on cleaning. Periodically, take time to jump in the piles of leaves with your kids! Dispose of the leaves in compost or green waste. Use a hose with high water pressure to spray off the surface dirt. Sprinkle some laundry detergent with bleach or bleach alternative onto the driveway stains. You may find powdered laundry detergent works better than liquid laundry detergent because of its scouring ability but either type of detergent works. Let the detergent sit on the stains for a few minutes then proceed to scrub the area with a heavy duty shop broom or scrub brush.

Rinsing:

Use the hose with high water pressure to rinse the area, taking off the soap and dirt, and stain. Be careful not to clog up storm drains with leaves at the end of your driveway or on your street

The Rest of the Driveway:

After you’ve cleaned the leaf stained areas, they will  really stand out from the rest of the driveway. You may wish to clean your entire driveway by hosing it down, sprinkling laundry detergent all around, scrubbing the driveway then rinsing.

Now relax and enjoy the lovely reds, oranges and yellows in your trees and all around you, now you know how to clean leaf stains off driveway.


How to Clean TOMS Shoes

How to Clean TOMS shoes:

There are a couple of ways to wash your TOMS which will keep them looking their best: handwashing or machine washing. Firstly, brush off all the dried on dirt from the shoes.

  • Handwashing  Soak the shoes in cold water and a small squirt of mild liquid dish soap. Using a small, soft bristle brush, gently brush the shoe material in a scrubbing motion. If your TOMS are the sparkly ones, be very careful to use the brush in the same direction as the sequins lay.
  • Machine washing Use the most gentle cycle on your washing machine. Select cold water and use a small amount of gentle detergent. When the water level is high enough to fully cover the shoes, add the shoes.

It is best not to put your TOMS in the dryer. The dryer can tear the fabric. The most recommended way to dry them is to air dry. You can stuff a fabric softener sheet in each shoe while they dry. This will help to alleviate shoe odors. Some people use baking soda in a sachet to deodorize the shoes, however, do not pour baking soda directly into your TOMS as this can dry out the insole.

And that is how to clean TOMS shoes!

How to Clean Silver Using Toothpaste

Toothpaste can be a very effective cleaner for silver. The baking soda in toothpaste is what does the job. First, choose the right toothpaste. Do not choose gel toothpastes or toothpastes with tartar control or whitening powers. These toothpastes may contain chemicals which could damage the silver.

cleaning silver with toothpaste
Cleaning silver

Wet the silver and dab a small amount of toothpaste on the area you are going to clean. (You may wish to test a small area first so as to see if you should be using toothpaste to clean your silver item.) Use a clean damp cloth and rub the toothpaste around on the silver. Keep rubbing gently until the silver is polished. Rinse the silver with water. As your cloth gets dirty, fold over to get clean areas. Once the silver is all rinsed, dry with a soft clean cloth. Repeat these steps on all the silver you wish to clean. On silver with intricate designs or grooves, you can use a soft toothbrush to work the toothpaste foam into the hard-to-reach areas.

Cleaning Grout | Fast Tips

Cleaning Grout|fast tips

Cleaning grout can be a tedious task; one trick I have used in the past is to spray the grout after a shower using a homemade mixture of bleach: Dilute the bleach with water  1 part bleach to 3 parts water before cleaning with it. Bleach is especially good for removing mold and mildew. It kills the mold and disinfectants too. It also removes stains and discolorations from white grout. Do not use beach on colored grout it can discolor the grout. Be careful when using bleach and any other cleaners, never mix cleaning chemicals especially those containing ammonia.

I also keep a plastic squeegee in the shower and do a quick squeegee of the walls and door to reduce the amount of hard water staining on the tile and grout.

Another quick option is to buy a Grout Pen which basically paints on a color to replace the dirty looking grout, but you have to clean first anyway before you can color the grout.

Cleaning Grout
Cleaning Grout

Cleaning grout can be a pain but by doing some of the work on an ongoing basis it can make the task easier.

Red wine

For a fresh red wine stain sprinkle salt on it to absorb the stain.  Rinse in cool and try to rinse out the stain before laundering.  A good home remedy is to use 3% hydrogen peroxide mixed with an equal volume of Dawn liquid soap. A good home remedy is to use 3% hydrogen peroxide mixed with an equal volume of Dawn liquid soap.

It’s important to note that hydrogen peroxide is a bleach and bleaches don’t actually remove stains, the stain is merely altered so that the color is less intense or invisible.  You should always test the colorfastness of you fabric before using any spot cleaning technique. Erado-sol is the name brand of a commercial stain remover sold in the medical industry that

Crystal Decanters

Decanters for wine and spirits are decorative vessels for storing and serving a wide variety of beverages.

Wine can be permitted time to breath before serving, and a leaded crystal decanter is far more stately than a Jim Beam or Jack Daniels bottle.  Often the decorative crystal or glass tops do not seal completely, and when used for alcoholic beverages, the alcohol can evaporate and leave stains, or even a hazy or cloudy appearance.

The first step is to place a thick towel in the bottom of the sink, as a sharp blow on a corner or edge might crack or chip the decanter.  Using warm water and soap fill the decanter and allow it to sit for a few hours or overnight to loosen any residue.  A bottle brush will allow you to gently scrub the bottom to loosen up tough stains.  Rinse the decanter thoroughly, as any remaining soap can taint the taste of future contents.  The decanter may look clean, and clear when wet, however the hazing or water stains, similar to a hard water deposits, may only be evident after the inside is dry.  Allowing a mild acid, such as white vinegar to sit in the decanter, again over night, usually will remove this film.  Some people use rice, rock salt, or baking powder to act as a bit of an abrasive that will aid in the removal of these stains as it is shaken or swirled around in the vinegar solution.  If the vinegar is not acidic enough to remove the film, a mild commercial acid such as CLR can be employed.  Limit the time that the CLR remains in the decanter, and give it a quick wash with regular dish detergent and water, ensuring a thorough rinse before drying the inside.

Some decanters have very narrow necks. Roll up a good quality paper towel and slide it inside the decanter.  (A cheap paper towel might fall apart or leave lint inside) Spin it around to unroll it inside, being careful not to allow the paper towel to fall inside completely!  Remove the paper towel and let the decanter sit out overnight to dry completely, then fill it up with your favorite beverage to be displayed and served in style!

Oil from BP Corporate logo

The How to clean anything logo.

We are committed to help cleaning up the world.

The BP corporate logo. Co-incidence?

Now they are also committed to cleaning up (part) of the world.

Despair.coms take on the BP Logo.

Sorry BP, we can clean almost anything, but we just cant

get that oil stain off your corporate logo

error

Enjoy this website? Please spread the word :)

Instagram
Follow by Email
RSS